Introduction to OAuth 2.0
Table of Contents

Authorization framework - OAuth 2.0 - is a very popular nowadays. With this blog post I try to explain how it works and its basic concepts so in following arcticle I could show how to implement it in a full stack app.
Love it or hate it. No matter how to you feel about security, it plays an important role in any application. As developers we usually focus on bringing new features that users wants, or trying out new tools rather than thinking of security. But regardless of our convictions, it’s highly irresponsible to put software which is not secured into operations.
There are different aspects of security in software engineering and clearly in a single blog post, or even in a series it’s not possible to tell everything about it. Therefore I would like to focus on one topic in particular - OAuth 2.0 protocol (and a little bit of OpenID Connect).
This article starts a short, practical series about how to implement security in software applications using OAuth 2.0 authorization protocol. First, I’ll explain basics of how it works (this article). Next I’ll move on to explaining it on a small project that will consists of three components (this will be part of next, upcoming blog posts):
Keycloak, open source identity and access management service, where users and roles will be defined,
backend application (Java, Spring Boot), will have protected resources (REST API endpoints) that only users with particular role will be able to consume,
frontend application (Angular), will consume protected resource and take care of authorizing user.
Passing credentials to third party applications #
One of the problem in a software security is how to make sure that system A is allowed to connect to system B. In other words, how to make sure that software applications are authorized to use one another. In case human to machine communication it’s fairly simple. User enters a website/mobile app and before doing anything it asks for valid credentials.
But what happens if we would like to have similar protection between two systems? To illustrate this problem, let’s suppose that we would like to login to Dev.to with GitHub account? (it’s possible now, but keep in mind that I don’t know how actually this integration works, I use it only to illustrate a possible scenario).
One solution for this problem would be to provide your GitHub credentials on Dev.to page. Then Dev.to would pass them (encrypted probably) to GitHub to check if they’re valid. Is it safe to show them to other system? Maybe that’s not the case for Dev.to, but theoretically some untrusted party could save those credentials and mess around with them in future.
And even if a middle man application is trusted one, there are still some use cases when such software would require to store user credentials.
For example, what happens when a GitHub user session expires? One solution would be to ask user once again for the credentials, but it’s not very user-friendly. Another would be to store credentials on Dev.to site and sent them if needed, which is even worse, which is a security violation.
Second case would be for a nightly jobs. Again, it’s maybe not the Dev.to case, but there are applications that do some batch jobs (e.g. process lots of data) during the night without user interaction. And if this job requires to fetch some protected data from other system it would need to store those credentials, which again should not happen
If we look now on these examples we would see that Dev.to (client application) is acting as a user in all these cases. It requests some data from GitHub (resource owner) and provides real username and password, so from the GitHub perspective Dev.to is no different than a human. Dev.to is impersonating her or him.
And it’s a potentially risky situation, especially for untrusted client applications (of course, I’m not talking now about Dev.to), becuase with your credentials they gain access to do anything with a resources. Going back to our example you probably don’t want Dev.to to be able to delete your repositories or make commits. You want to grant them only limited access, like to have information only basic information about you and maybe have access to a list of your repositories.
And among others this is the reason why OAuth protocol was created.
OAuth 2.0 flow (from user perspective) #
Before jumping to the details let’s see how OAuth 2.0 flow usually looks like from a user perspective, because I’m sure that you go thru this process once or twice.
Going back to an example with Dev.to and GitHub, let’s say that I would like to check my repositories list on user information page (currently Dev.to doesn’t have this feature, but let’s say it has it). Therefore I go to settings page - https://dev.to/settings. It turns out that I’m not logged in so Dev.to redirects me to the login page.

During registration I’ve picked a GitHub option therefore now I also need to pick it. Now I’m redirected to the Github login page.

What’s important is that I’m now on GitHub page. When I’m checking the URL of a website in a browser, it’s no longer dev.to, it’s github.com. So I could be sure that a credentials that I’ll provide in a second will not be seen by Dev.to.
After providing my username and password I’m redirected back again to Dev.to website and I can do whatever I want there.
Now you may ask:
How this magic is possible? What else is happening in the background?
Let’s dive into it and see a full picture of described flow.
OAuth 2.0 flow (Authorization grant, full picture) #
To fully understand how OAuth 2.0 works first we need to introduce all actors (roles) that are part of it.
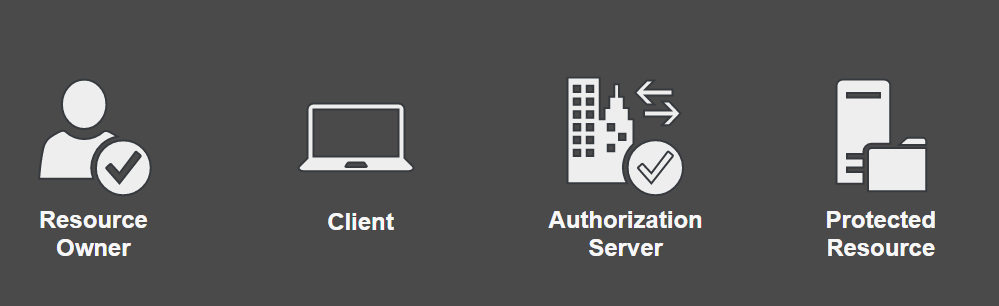
Resource Owner - usually it’s a person, a user. She/He grants access to protected resource to a clients.
Client - it’s an application that on behalf of a resource owner would like to access a protected resource. An example of such client could be web browser, mobile or other third party application (in previous example it would be Dev.to).
Authorization Server - is responsible for verifying the identity of a user and granting access tokens, credential needed to access protected resource by a client (I’ll explain what tokens are a little bit later).
Protected Resource - is an application that a client wants to access (in previous example it would be GitHub). It authorized clients based on an access token provided by clients.
I guess that even if I shortly introduced those key actors you probably don’t have full understanding that’s their role. But that’s ok, let’s move on to explain how they interact with each other, so it will be more clear.
Again let’s go back to example with Dev.to and GitHub. And again I would like to emphasize that what I describe below is not how it really works between those two applications. It’s just my imagination, which I hope will help you better understand how everything works.

Let’s assume that I’m a resource owner and I would like to check my user information. Therefore I go to settings page - https://dev.to/settings (1). Because I’m currently not login it redirects me to the login page and I pick a GitHub option there (2).
I’m now on GitHub page. What is worth to mentioning here, is the fact that to the basic GitHub URL new parameters have been added:
client_id- it’s an identification of a client application, which tells authorization server (GitHub in this case) for which application access will be granted,response_type- indicates a grant type (tells authorization how we would like to obtain access token, more about will be described going thru entire flow), a value here iscodescope- represents a set of rights (what action or resource will be allowed by client to do) at protected resource, e.g. read, write, etc, in our example it’suser,email,repowhich means that Dev.to would like to have access to user, email address and repositories information,state- it’s one time credential, usually randomly generated plain text, is necessary to match a client’s request with authorization server’s responseredirect_uri- after successful login, authorization server will redirect user to this page served by client application
And example od such URL would be:
https://github.com/login?client_id=devto_id&response_type=code&scope=user,email,repo&state=sFf4sd&redirect_uri=https://dev.to
After providing my username and password (3) I’m redirected back again to Dev.to website (4 & 5). But this time in a request from my browser to client’s server there is a new parameter added by GitHub to the URL, which is a code.
A code is one-time credential that client’s application can use to obtain access token from the authorization server.
Now, Dev.to has code credential from a resource owner and together with its own one (client_id & client_secret) it can make a request to the GitHub’s authorization server to obtain access token (6).
As a result client’s application gets an access token (7) (and sometimes identity and refresh tokens, I’ll explain more about them later), which now can be added to Authorization header of a request to GitHub to get my email address (8).
Finally Dev.to receives my email address (9), combines with other information that their holding in their database and sends me the entire response (10).
And that’s it! In nutshell this is how OAuth 2.0 flow looks like in case of login in.
User scope definition #
In case of registration, so when you would like to connect to the Dev.to with GitHub credentials there is additional step in this process.
After providing user credentials on GitHub page I’m prompted to confirm authorization of Dev.to to have my user information.

On this screen we can define to which resources, on GitHub site, we can grant access to for Dev.to. On above picture it clearly says that only email address (in read-only mode) will be taken from there, which is a real case. In my example Dev.to would need also to ask for access to the repository list.
In this step we can define what scope, what information, we would like to grant permission to read (or write) for a client applications. This decision is totally up to the resource owner and it gives her/him a control of how much power she/he wants to give to a client software.
Authorization grants #
What was described in previous section is called Authorization Code Flow (Grant) and it’s one of several flows defined in OAuth 2.0 framework. Each one of them describes how to obtain access token (credential) and can be a little bit different than what was presented in previous diagram. Apart from mentioned flow there are also:
Client Credentials - usually used in machine-to-machine communication when a human is not involved in any particular step, so there is no resource owner,
Resource Owner Password Flow - not recommended, but could be used for highly-trusted client applications. The reason for that is that here resource owner credentials are provided to the client which then pass them to the authorization server, which might cause a security bridge,
Implicit Flow - initially it was designed to be used for clients that runs in a web browser (Angular, React, Vue, etc.) in which a resource owner’s web browser received an access token, so she/he needs to store it on their side (e.g. in browser’s Local Storage). Currently this approach is not recommended, as potential attackers could steal such token from user’s Local Storage.
All these are seen as less secure than Authorization Code Flow, but it heavily depends on the scenario. And how to pick the right one? There are couple places where it’s described. For example on auth0.com by answering simple questions you can roughly find the most suitable one. Also on mentioned page there are descriptions for each flow, but if you still wants to know more there is a great article on Medium published by Takahiko Kawasaki
Tokens #
Access Token #
Another thing that was only mentioned, but not explained, was access token itself. For now you know that it’s some sort of credentials written in a plain text. But how it looks like?
In OAuth 2.0 specification there are no guidance how such token should look like, which makes this open for custom implementation.
For example it could be just a simple string with random characters:
dsXf34x82Sgewr546sd24vac1
Or it could be more structured and cryptographically protected. Main advantage of that approach is the fact that tokens can hold some useful information instead of being just a random text. An example of such information could be resource owner’s permissions. One of the most popular, and de facto a standard, is JWT.
JSON Web Token (JWT) #
Below there is an example of JWT token (from a project which will be described in next blog post):
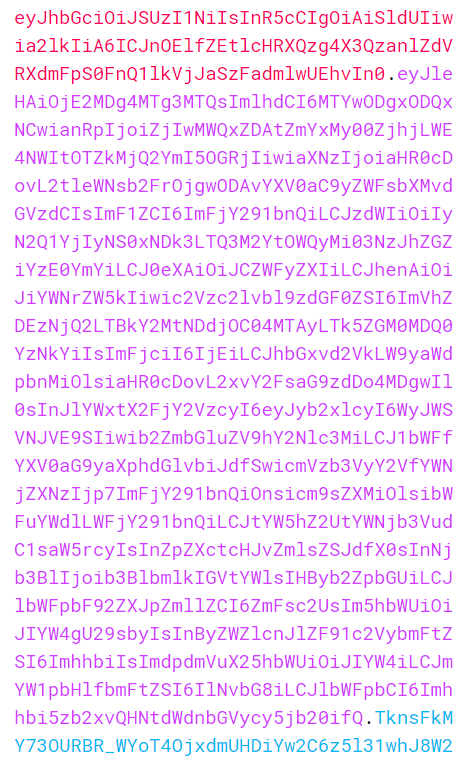
Still, it seems like a text with random characters. But if you look closer you can see that it’s made of 3 sections separated by dots. On above picture those sections are marked with colors - red (header), purple (payload) and blue (signature).
Each of these sections are encoded JSONs with Base64. The reason for that is because tokens are usually transported in an HTTP header there is a possibility that during it some data may be modified (uncommon characters for example). Also it makes those JSONs more compacted, with fewer number of characters. But be sure, this token is not encrypted, so anyone could read it with Base64 decoder!
Now, let’s move on to decode each section of JWT and find out what’s inside it. To do that I’m using a website https://jwt.io.
Header

It contains some metadata, like alg which specifies what type of a signing algorithm was used (I’ll talk more about them later).
Payload

It’s a main course of JWT. After decoding a payload we can see several fields with various information about a user and more. They’re called claim.
In general, we can put here anything what we want (roles, organization restrictions etc.), but there some recommended fields that could be added:
iat(issue at) - tells when token was generated (Unix Epoch),exp(expiry) - specifies a timestamp when token will expire,iss(issuer) - indicates who created a token, usually it’s an URL to the authorization server,sub(subject) - it tells, whom data are in a payload, usually it’s an identification of a resource owner,jti(unique identifier) - identifier of a token.
Signature
The essential concept behind JWT is the fact that anyone should be able to read the content of a token, but only an authorized server can create a valid one. Therefore a protected resource should somehow verify if a token is correct. If for some reason it will be skipped there is a possibility that an unauthorized client (or even worse, a malware program) creates a dummy token and do funky stuff.
To prevent that from happening a third secation was added to JWT, called signature. Only with it we can be sure that a token is correct.
But how it really works?
There are several ways to create a valid signature, but the most common approach is to combine encoded JWTs’ header and payload with a secret and cryptographic algorithm. Based on these 4 inputs a unique signature can be created.
Signature = Cryptography(Header + Payload + secret)
If any part of this equation will be modified (e.g. payload) a signature also will be changed. And that is only possible when you know a signing alogrithm (info is provided in a JWT’s header) and a secret.
Depending on the algorithm those secret can be used in a different ways.
First, popular approach to generate signature is with symmetric key cryptography - HS256. In it we have a single secret which is shared between authorization server (to create token) and protected resource (to validate a signature). The main drawback of it is the fact that it both parties authorization server and protected resource(s) needs to have the same non-public secret. It’s not big problem if both of them are the same application or share the same database, but it might get tricky when we have it as separate entities and need to safely copy-paste it from one to another.
Another approach is to use an asymmetric signature RS256 in which there is a pair of public and private keys. An authorization server has access to private key which is used to generate a signature. Also authorization server is providing a public key, which can’t be used to sign a JWT, but can be used by a protected resource to verify if a signed JWT is correct. A public key can be provided in several ways, but usually it’s by HTTP endpoint so various applications could make a use of it.
Refresh Token #
Up till now I’ve covered basic flow of the OAuth 2.0, which is obtaining the access token. In the part about JWT it was mentioned that tokens has an expire date, which means that after certain time they won’t be valid. And usually it’s after a short period of time, like couple of minutes.
To prevent client from asking resource owner again for credentials a new kind of a token was introduced - refresh token.
Refresh token can be treated as a credentials that can be used to obtain access token, but this time they’re not assigned to the resource owner, but to the client, which can use it to obtain a new access token.
What is important, refresh token is not a valid access token and can’t be sent from client to protected resource. Technically it can, but protected resource should reject it.
Another key difference between both token is their life time. Access tokens are usually valid for couple minutes, but a refresh token can be used for couple hours or even days.
Here is the flow, how a refresh token can be used between OAuth 2.0 actors:

Going back to our example, let’s assume that I after couple of minutes I would like again to load my user information page on Dev.to. Therefore I load a page (11) and Dev.to needs to get my repositories information so using an access token that it already has from previous example it makes again a request to the protected resource (12).
Protected resource is than checking the token and sees that it’s expired so it returns an error code to the client (13). Luckily the client has stored a refresh token and it’s making a new request to the authorization server (14) including a token in a request header.
As a result authorization server returns a new access and refresh token (15) (plus, possibly an identity token, which will be described in following section) so a client is able to make a request to the protected resource (16) and return a final result to me (17, 18).
And how refresh token looks like ?
Of course, it depends, but it’s very common to use JWT format:

which could be decoded to header:

and payload with claims:

There is nothing new here, which wasn’t in access token. The only difference is in algorithm, which here it’s HS256, which is sufficient enough as this token is issued and validated by the authorization server and therefore there is no need to share a private key among protected resources.
Identity Token #
If we look closer into the OAuth 2.0 specification we found out that it was designed to handle granting access to protected resource, it describes what user/client can do and has access to (e.g. read, write, delete). It’s impersonal, because there is no information about who is the user. Only what actions can be done. And this is called authorization.
On the other hand, there is a concept of authentication which validates if a user is whom she/he claims to be. It has nothing to do with what permissions they have.
Going back to our previous example with Dev.to and GitHub, let’s say that our client, Dev.to, would like to know something about the user that has logged in. Let’s say an email address and where a user is located.
We could do it with similar approach as it was previously, using access token and making another call to GitHub to get what we want, but there is another way by adding necessary information to a token.
But this another way which is not described in OAuth 2.0 framework for reasons mentioned earlier, it’s an authorization framework and content of access token should not be analyzed by a client (in our case Dev.to). An access token for a client is just a gibberish, by design it should be analyzed only by the protected resource.
To overcome this limitation a new framework was introduced - OpenID Connect (OIDC) - which is build on top of the OAuth 2.0. In other words OIDC uses the same flows as OAuth 2.0 and extend it with couple new features.
The most important one is that if a client make a request to get access token it will also received a new one - identity token (ID token), which hold user information. To make sure that information are correct identity token are represented in JWT format, where payload is very similar to the access token’s.
And what’s worth mentioning, identity token is designed to be used only by a client application and should not be used to get resource from the protected resource.
Conclusions #
I hope that with this article you have learn something new about OAuth 2.0. At the beginning it might be quite a lot to digest, but definitely it’s worth it as it’s used in many projects nowadays and it’s considered as a good practices.
If you would like to see a more practical approach, how everything works, go check my other blog post (ther’re part of this series) on this topic in which I’m showing:
- how to set up a Keycloak instance (authorization server),
- build token verification in Spring Boot application (protected resource),
- and combine everything in Angular application.