Make Testing Fun (Again) With Spock Framework
Table of Contents

This blog post is all about introduction to another, very popular test framework used in Java ecosystem. I would like to share with you how combination of almost natural Groovy language and cool Spock test framework could bring joy while writing tests.
Writing tests might be hard. There are several reasons why it could be. Maybe a person who is writing them lacks experience. Maybe a code base is written in a way that it is almost impossible to test it. Or developer thinks that writing them takes more time than coding real implementation.
Today I want to share with you a great testing tool that may help you see that testing might be also fun. And this tool is called Spock.
Before jumping to examples, let me first explain why for me it’s good to write tests:
they’re checking if a code is working — the most basic one, we write them to make sure that implementation of our code is working,
regression — when we add new functionality or refactor an application we want to make sure that old features are working as previously,
help focus on the problem that needs to be resolved (TDD) — most of developers likes to code. That’s not something new, but we sometimes, and I’m speaking also about myself, want to start coding it right away just right after when we get a new requirement. In general it’s a good thing that we have such passion in our work, but there could be situations when we think that we fully understand the requirements, but its not true. And that’s why the idea of writing tests first, before implementation (Test Driven Development, TDD), might help find those misunderstandings, because first we need to think of what needs to be the expected outcome before thinking of how we would like to achieve it,
documentation — tests might be great, living documentation. They describe how an application works and make sure to keep it that way. To keep it that way they need to be written in a very simple way, so that even non-developers could read them, and that might be a challenge.
If you’re a Java developer, as I am, and if you write tests you probably have used JUnit 4 or JUnit 5 test framework. In JVM ecosystem they are sometimes treated as default one and the only one. But they are not the only one from which we can choose. Other, also popular are TestNG and Spock, which is a topic of this article.
I’ve recently started to write tests with Spock, which also means that I started to learn a new programming language — Groovy. If you’re Java developer, it would be super easy for you to learn it so don’t worry if you’re concern that it might cost you more time. Plus Groovy, which I recently found it, has really nice syntax and tries to reduce many of boilerplate parts of the Java code.
After an introduction let’s explore what are the capabilities of the *Spock *and first I will present how to migrate a simple JUnit test and then I’ll show what other awesome features this framework has.
Basic set up of a project #
As usual, before having fun with coding we need to go thru boring set up of a project.
As an example I’m using my old one — library-hexagonal, which is a Spring Boot application and it’s build with Maven.
To enable Spock first we need to add two dependencies to a pom.xml file, listed below.
<dependencies>
	<dependency>
		<groupId>org.spockframework</groupId>
		<artifactId>spock-core</artifactId>
		<version>1.3-groovy-2.5</version>
		<scope>test</scope>
	</dependency>

	<dependency>
		<groupId>org.spockframework</groupId>
		<artifactId>spock-spring</artifactId>
		<version>1.3-groovy-2.5</version>
		<scope>test</scope>
	</dependency>
</dependencies>
Because tests in Spock are written in Groovy language we need to tell Maven to handle that by adding following plugin.
<build>
	<plugins>
		<plugin>
			<groupId>org.codehaus.gmavenplus</groupId>
			<artifactId>gmavenplus-plugin</artifactId>
			<version>1.10.0</version>
			<executions>
				<execution>
					<goals>
						<goal>compileTests</goal>
					</goals>
				</execution>
			</executions>
		</plugin>
	</plugins>
</build>
And that’s it! It‘s a minimal configuration that is needed to run Spock tests!
If you want to follow the Spock convention of naming tests, which is calling them Spec (specifications), not Test , you will need to configure the Maven Surefire plugin to execute not only test files that has Test in its name, but also those with Spec at the end.
<build>
	<plugins>
		<plugin>
			<groupId>org.apache.maven.plugins</groupId>
			<artifactId>maven-surefire-plugin</artifactId>
			<configuration>
				<reportsDirectory>target/test-report</reportsDirectory>
				<includes>
					<include>**/*Spec.java</include>
					<include>**/*Test.java</include>
				</includes>
			</configuration>
		</plugin>
	</plugins>
</build>
Migration of JUnit tests #
Let’s start with a simple JUnit5 example:
class BorrowingFacadeTest {

    private BorrowingFacade facade;
    private InMemoryBorrowingDatabase database;

    @BeforeEach
    public void init(){
        database = new InMemoryBorrowingDatabase();
        facade = new BorrowingFacade(database);
    }

    @Test
    @DisplayName("Make book available")
    public void whenMakeBookAvailableCommandReceived_thenBookIsOnAvailableStatus()
        //given
        MakeBookAvailableCommand makeBookAvailableCommand =
        MakeBookAvailableCommand.builder()
            .bookId(100L)
            .build();

        //when
        facade.handle(makeBookAvailableCommand);

        //then
        assertTrue(database.availableBooks.containsKey(100L));
        assertTrue(database.availableBooks.containsValue(new AvailableBook(100L)));
    }
}

class InMemoryBorrowingDatabase implements BorrowingDatabase {

    ConcurrentHashMap<Long, AvailableBook> availableBooks = new ConcurrentHashMap<>();

    @Override
    public void save(AvailableBook availableBook) {
        availableBooks.put(availableBook.getIdAsLong(), availableBook);
    }
}
The aim of this test is to check if a book has been made available (in a library) after adding it. It’s very simple, but you might not be familiar with my approach of creating a simple, in memory implementation of some classes, just for testing, like InMemoryBorrowingDatabase . I usually prefer this approach instead of creating mocks and stubs. More about it you can read in my other blog post.
To migrate this test to Spock let’s create a new folder called groovy in /src/test of a project root. Then create folders that will match a package structure of migrated test, so in my case it will be — io.wkrzywiec.hexagonal.library.domain.borrowing .
There, create a Groovy file - BorrowingFacadeSpec.groovy inside of which declare a class with the same name.
package io.wkrzywiec.hexagonal.library.domain.borrowing

import spock.lang.Specification

class BorrowingFacadeSpec extends Specification {

}
As you can see our test class is extending a Specification class, which is necessary for each Spock test.
Specification? We’re writing tests, not documentation!
If you have similar though as above one, I would partially agree with you. With Spock we write tests which are very close to natural language, which is the fundamental principle for this framework — to write a living documentation.
Now, it’s time to migrate first test, therefore copy it from the source class and paste it to the new one.
class BorrowingFacadeSpec extends Specification {
    private BorrowingFacade facade;
    private InMemoryBorrowingDatabase database;

    @BeforeEach
    public void init(){
        database = new InMemoryBorrowingDatabase();
        facade = new BorrowingFacade(database);
    }

    @Test
    @DisplayName("Make book available")
    public void whenMakeBookAvailableCommandReceived_thenBookIsOnAvailableStatus() {
        //given
        MakeBookAvailableCommand makeBookAvailableCommand =
                MakeBookAvailableCommand.builder()
                        .bookId(100L)
                        .build();

        //when
        facade.handle(makeBookAvailableCommand);

        //then
        assertTrue(database.availableBooks.containsKey(100L));
        assertTrue(database.availableBooks.containsValue(new AvailableBook(100L)));
    }
}
Now run the test (in your IDE or with mvn clean test) and… everything is working! Test is passing. Good job! 🎉 See you next time 😜…all right I was just kidding.
First of all why it worked?
Groovy is a language that extends Java, so all the *Spock *tests could be written in good old Java. And that’s first key takeaway —you don’t need to learn new language (but I think you should, it’s really easy). Another point is that Spock is using JUnit runner, so it’s compatible with common build tools (Maven, Gradle) and IDE (IntelliJ, Eclipse).
I assume that copy-pasting tests to new classes, with different extension is not so exciting after all, so let’s change a little bit of above test, by removing all JUnit 5 annotations.
Therefore, we need to remove @Test ,@DisplayName and @BeforeEach annotations. With first one, there is no issue, as it’s not necessary to annotate test methods in Spock. About second one I’ll elaborate in a minute, so let’s move on straight to the last one.
@BeforeEach annotation is used on methods which needs to be run before each test in this class. In Spock there is the same concept, but instead of annotating a method we need to give it a special name — setup() . There are also other special methods that could be used for test lifecycle, a list is available in the official docs.
As a result we have this class:
class BorrowingFacadeSpec extends Specification {
    private BorrowingFacade facade;
    private InMemoryBorrowingDatabase database;
    private BorrowingEventPublisher eventPublisher;

    public void setup(){
        database = new InMemoryBorrowingDatabase();
        eventPublisher = new BorrowingEventPublisherFake();
        facade = new BorrowingFacade(database, eventPublisher);
    }

    public void whenMakeBookAvailableCommandReceived_thenBookIsOnAvailableStatus() {
        //given
        MakeBookAvailableCommand makeBookAvailableCommand =
                MakeBookAvailableCommand.builder()
                        .bookId(100L)
                        .build();

        //when
        facade.handle(makeBookAvailableCommand);

        //then
        assertTrue(database.availableBooks.containsKey(100L));
        assertTrue(database.availableBooks.containsValue(new AvailableBook(100L)));
    }
}
Are you excited? Probably not. After all there is nothing new here. But don’t worry, now that’s a time for a big change.
First of all, in Groovy we can create methods using key world def , which will replace public void in above case.
Next, Groovy allows to name methods with a String literals, so instead of whenMakeBookAvailableCommandReceived_thenBookIsOnAvailableStatus() we can name this method “Make book available”(). See? The method can now have whitespaces and special signs, which makes it more human readable!
Then we can replace comments //given, when, then with so called blocks — given , when and then . They split a test into sections which makes it more readable. Also we can add descriptions for each block to give a hint to a person who will be reading it.
In given section all required objects and state are set up. In when tested feature/class/method is invoked and the outcome of it is checked in then section.
To finalize this round of refactoring we need to change a then section, so instead of both assertions (assertTrue) we can translate them to conditions, which describes expected state in a simpler way.
As a result:
class BorrowingFacadeSpec extends Specification {
  private BorrowingFacade facade;
  private InMemoryBorrowingDatabase database;
  private BorrowingEventPublisher eventPublisher;

  def setup(){
    database = new InMemoryBorrowingDatabase();
    eventPublisher = new BorrowingEventPublisherFake();
    facade = new BorrowingFacade(database, eventPublisher);
  }

  def "Make a book available"(){
    given: "prepare a command"
    MakeBookAvailableCommand makeBookAvailableCommand =
          MakeBookAvailableCommand.builder()
                .bookId(100L)
                .build();

    when: "receive MakeBookAvailableCommand"
    facade.handle(makeBookAvailableCommand);

    then: "check database to have this book as available"
    database.availableBooks[100L] == new AvailableBook(100L);
    }
}
Cool, it looks a way nicer!
To put a final touch let’s get rid of semicolumns ; as Groovy doesn’t need them.
Also we don’t need to provide a type of objects that are created (MakeBookAvailableCommand), instead we can use def keyword (Groovy is dynamically-typed language, it determines a type of an object by its value) to make it shorter.
And finally, as in Groovy we can access private fields we can get rid of a builder to create a MakeBookAvailableCommand object and pass a bookId in a constructor, therefore a final version of a test (or a feature, as it’s called in Spock):
class BorrowingFacadeSpec extends Specification {
    private BorrowingFacade facade
    private InMemoryBorrowingDatabase database
    private BorrowingEventPublisher eventPublisher

    def setup(){
        database = new InMemoryBorrowingDatabase()
        eventPublisher = new BorrowingEventPublisherFake()
        facade = new BorrowingFacade(database, eventPublisher)
    }

    def "Make a book available"(){
        given: "prepare a command"
        def makeBookAvailableCommand = new MakeBookAvailableCommand(100)

        when: "receive MakeBookAvailableCommand"
        facade.handle(makeBookAvailableCommand)

        then: "check database to have this book as available"
        database.availableBooks[100L] == new AvailableBook(100)
    }
}
Failed test reporting #
Let’s have a look on another great feature of Spock which is printing descriptive explanation, when test fails. To present it, I have modified a little bit a condition in then section and after running test again I got following message:
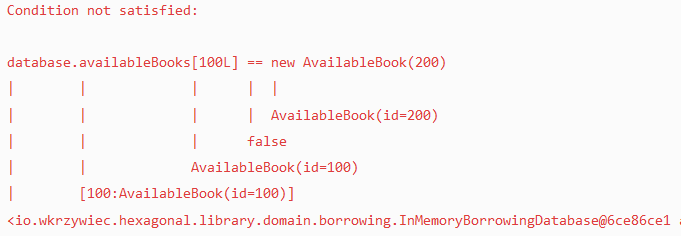
As you can see, Spock is printing all objects that are part of this assertion to make it easier to spot an error.
On above screenshot you can see that a database object is not well printed, it’s because it doesn’t have own toString() method implemented, as AvailableBook class has.
Spring Boot Test in Spock #
Until now, the example that I was presenting was fairly simple and quick unit test, but what if we would like to write an integration test, e.g. to connect with a database?
Fortunately Spock allows to integrate with many frameworks for doing that, e.g with Testcontainers or Spring Boot Tests.
Therefore let’s discuss another test example that will use Spring’s @DataJpaTest annotation.
@DataJpaTest
class JokeServiceSpec extends Specification{

    private JokeService jokeService
    @Autowired
    private JokeRepository repository

    def setup(){
        jokeService = new JokeService(repository)
    }

    @Sql(scripts = "classpath:data/sample-joke.sql")
    def "Get Joke by id"(){

        when: "get joke by id"
        def jokeOpt = jokeService.fetchJoke(1)

        then: "joke is fetched"
        jokeOpt.get().value == "Chuck Norris doesn’t read books. He stares them down until he gets the information he wants."
    }
}
Starting from the top, @DataJpaTest annotation marks that declares a Spring context with only those beans that are necessary to be able to connect to database with JPA. Next there is a @Autowired annotation which tells Spring to inject a specific bean JokeRepository, which we can than use to create a JokeService so that it will be connected with H2, in memory database during test. And finally there is a @Sql annotation which points out to a file in which there is an insert SQL statement which populates table in a database before running the tests.
All these three annotations are purely Spring related and are usually used in JUnit tests. Luckily in Spock we can use them as well, without learning new way of running integration tests, which is very convenient.
Parameterized tests #
Let’s say that you have a method which has an input and as a result it provides an output. And now you would like to test various number of inputs and check if an output in each case is correct. How you would write test for that?
Probably for each case would be one test method, therefore you would end up with lots of code which most of the time is repeated. But there is a remedy for that — parameterized tests.
The idea is pretty simple — you need to write a template test method and make dynamic some values (e.g. input and output) and then provide a set of those values.
Here is an example of such test for simple multiplication calculator operation, written with Spock.
class CalculatorSpec extends Specification {

    def "Multiplication operation"(){
        expect: "multiply two values"
        Calculator.multiply(first, second) == result

        where: "sample data"
        first   |   second  ||  result
        1       |   1       ||  1
        2       |   -1      ||  -2
        -2      |   -2      ||  4
    }
}
What we have here? Similarly to previous example this test is splitted into blocks, but here they are called expect and where here.
In the first one we invoke method that is under a test with dynamically assigned parameters — first , second and result . Values for all of them are located in where block in the table, where each columns is for each variable. Each row in a table represents different test case.
It’s so easy to write this test that even a non-developer person could write at least such test table with all regular and corner cases to make sure that a software works as it was designed.
Only small remark here, JUnit also provides a way to write parameterized test, but I found it more complicated than it’s resolved in Spock.
Test documentation #
Last thing that I would like to highlight is that because tests written with Spock can be so easy to read so that they can be treated as living documentation. Like I mentioned at the beginning, if they’re done right they can be part of documentation, and good thing is that it will always be correct!
Of course, non-developers probably don’t want to dive into the code, no matter how we think easy it is. Therefore it is possible to generate HTML test report which might be more convenient for them.
To enable that first we need to add a new dependency to pom.xml file.
<dependency>
	<groupId>com.athaydes</groupId>
	<artifactId>spock-reports</artifactId>
	<version>1.8.0</version>
	<scope>test</scope>
	<exclusions>
		<exclusion>
			<groupId>*</groupId>
			<artifactId>*</artifactId>
		</exclusion>
	</exclusions>
</dependency>

<!-- // if you don't already have slf4j-api and an implementation of it in the classpath, add this! -->
<dependency>
	<groupId>org.slf4j</groupId>
	<artifactId>slf4j-api</artifactId>
	<version>1.7.30</version>
  	<scope>test</scope>
</dependency>
<dependency>
  	<groupId>org.slf4j</groupId>
  	<artifactId>slf4j-simple</artifactId>
  	<version>1.7.30</version>
  	<scope>test</scope>
</dependency>
Then add a com.athaydes.spockframework.report.IReportCreator.properties to the src/test/resources/META-INF/services directory. A content of a file:
# Name of the implementation class(es) of report creator(s) to enable (separate multiple entries with commas)
# Currently supported classes are:
#   1. com.athaydes.spockframework.report.internal.HtmlReportCreator
#   2. com.athaydes.spockframework.report.template.TemplateReportCreator
com.athaydes.spockframework.report.IReportCreator=com.athaydes.spockframework.report.internal.HtmlReportCreator

# Set properties of the report creator
# For the HtmlReportCreator, the only properties available are
# (the location of the css files is relative to the classpath):
com.athaydes.spockframework.report.internal.HtmlReportCreator.featureReportCss=spock-feature-report.css
com.athaydes.spockframework.report.internal.HtmlReportCreator.summaryReportCss=spock-summary-report.css
com.athaydes.spockframework.report.internal.HtmlReportCreator.printThrowableStackTrace=false
com.athaydes.spockframework.report.internal.HtmlReportCreator.inlineCss=true
com.athaydes.spockframework.report.internal.HtmlReportCreator.enabled=true
# options are: "class_name_and_title", "class_name", "title"
com.athaydes.spockframework.report.internal.HtmlReportCreator.specSummaryNameOption=class_name_and_title

# exclude Specs Table of Contents
com.athaydes.spockframework.report.internal.HtmlReportCreator.excludeToc=false

# Output directory (where the spock reports will be created) - relative to working directory
com.athaydes.spockframework.report.outputDir=target/spock-reports

# Output directory where to store the aggregated JSON report (used to support parallel builds)
com.athaydes.spockframework.report.aggregatedJsonReportDir=

# If set to true, hides blocks which do not have any description
com.athaydes.spockframework.report.hideEmptyBlocks=false

# Set the name of the project under test so it can be displayed in the report
com.athaydes.spockframework.report.projectName=

# Set the version of the project under test so it can be displayed in the report
com.athaydes.spockframework.report.projectVersion=Unknown

# Show the source code for each block
com.athaydes.spockframework.report.showCodeBlocks=true

# Set the root location of the Spock test source code (only used if showCodeBlocks is 'true')
com.athaydes.spockframework.report.testSourceRoots=src/test/groovy

# Set properties specific to the TemplateReportCreator
com.athaydes.spockframework.report.template.TemplateReportCreator.specTemplateFile=/templateReportCreator/spec-template.md
com.athaydes.spockframework.report.template.TemplateReportCreator.reportFileExtension=md
com.athaydes.spockframework.report.template.TemplateReportCreator.summaryTemplateFile=/templateReportCreator/summary-template.md
com.athaydes.spockframework.report.template.TemplateReportCreator.summaryFileName=summary.md
com.athaydes.spockframework.report.template.TemplateReportCreator.enabled=true
Content of this file was copy-pasted from the official documentation. The only tweaks are com.athaydes.spockframework.report.showCodeBlocks=true (to show the code blocks in resulting report) and com.athaydes.spockframework.report.outputDir=target/spock-reports that customize where the output report will be placed.
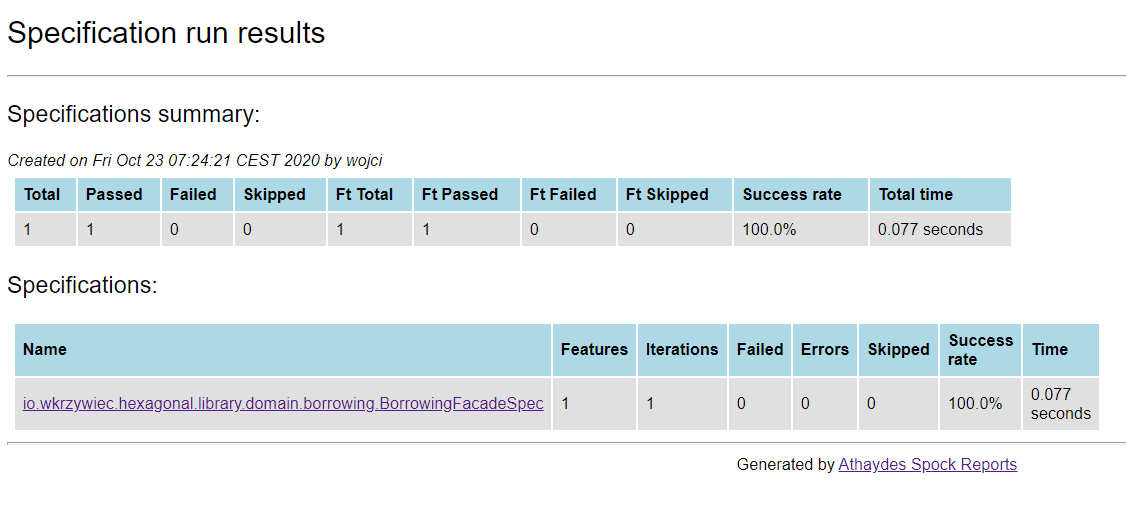
Now, if you run the mvn clean test command, inside target folder there will be a new folder called spock-reports which will have index.html file, which can be opened in a web browser.
Here is the main page of that report.
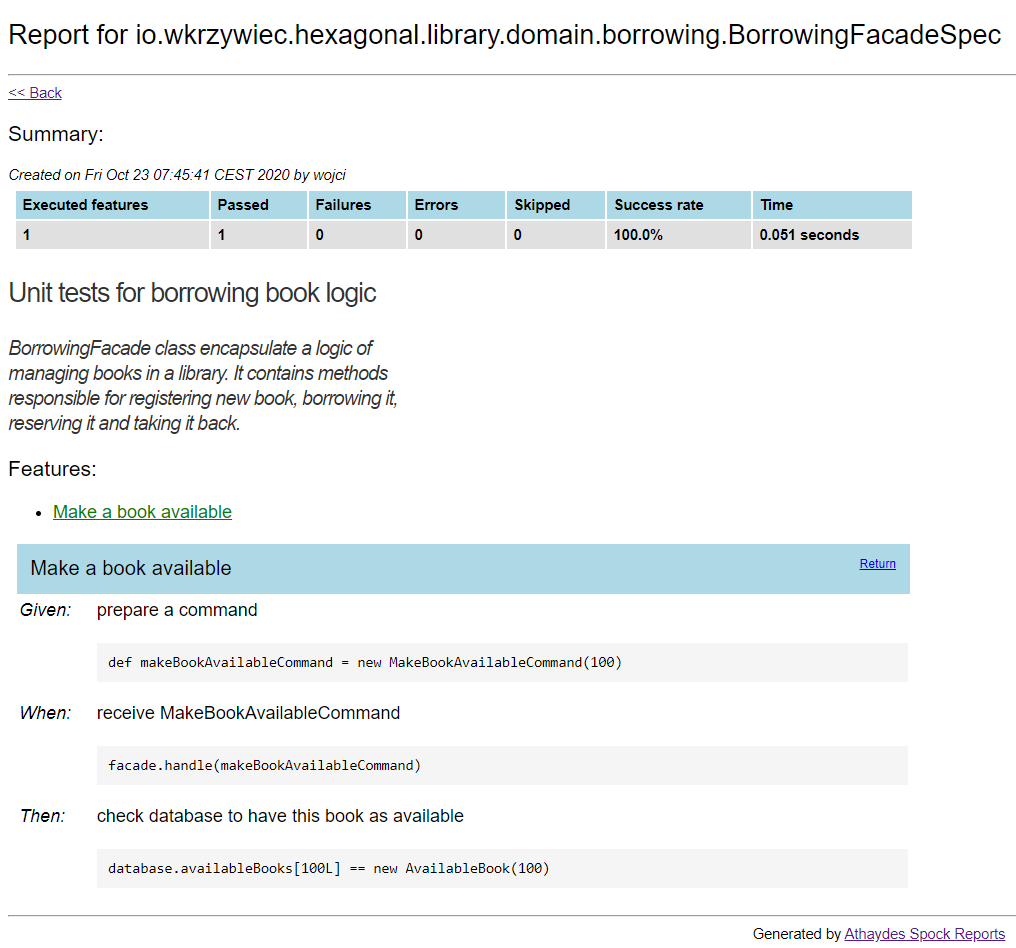
And here is the detailed view for a BorrowingFacadeSpec

Cool, that looks nice! But it’s not everything. We can add more descriptions here, so that a report will be even easier to understand! To do that, let’s go back to our code and add new annotations to Spec class.
@Title("Unit tests for borrowing book logic")
@Narrative("""
BorrowingFacade class encapsulate a logic of
managing books in a library. It contains methods
responsible for registering new book, borrowing it,
reserving it and taking it back.
""")
@Subject(BorrowingFacade)
class BorrowingFacadeSpec extends Specification
Here I’ve added three new annotations:
@Title — short name of the Specification, written in plain English,
@Narrative — it’s a longer title, it can give some background and additional explanation,
@Subject — here we annotate which class is taken under the test (sometimes it’s hard to spot on, which one it is).
And the resulting report looks as follows.
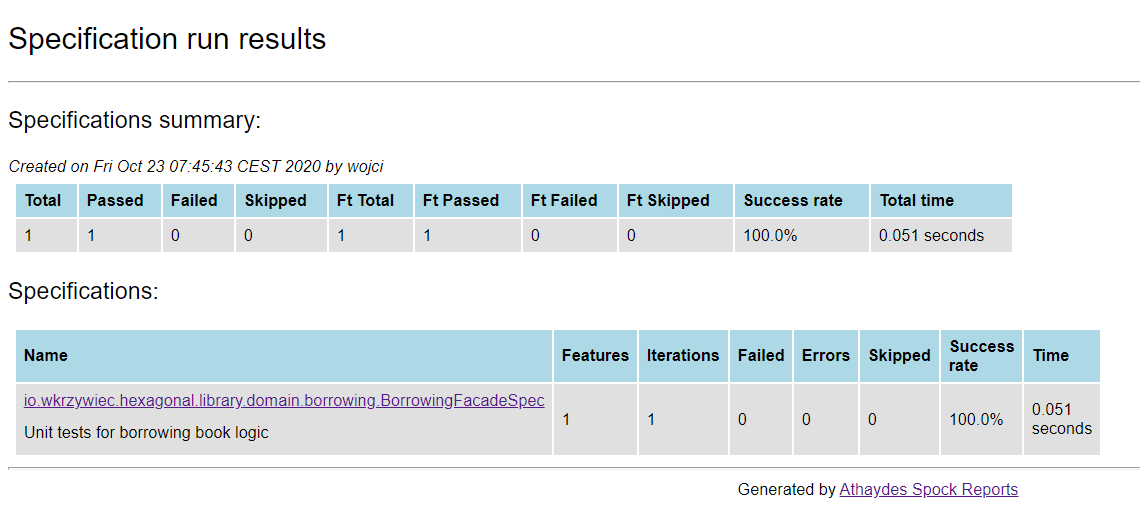
If you want a report template can be customized, more about the could be found in the official documentation.
Conclusion #
I hope that you enjoyed this entry and are eager to try it out on your own. All of what was presented here is just a tip of an iceberg of features that Groovy and Spock provides, therefore I would encourage you to check the official documentation, which is really great, or read a book that I’m mentioning in the References section.
Happy testing! 🙂🔥🧪