Continuous Integration of Java project with GitHub Actions
Table of Contents
In this blog post, I am going to present how I’ve set up my Continuous Integration with GitHub Actions workflows which helps me develop better quality Java application.
Since the end of 2019 GitHub has released its CI/CD (Continuous Integration and Continuous Delivery) tool that helps developers automate their work in building, testing and deploying their application. So all of us can focus on that is the most important and brings the most value — coding.
It’s worth to know, GitHub Actions are not the first tool of this kind. Today there are plenty of them available, like Jenkins, GitLab CI, Travis CI, CircleCI or TeamCity. Unlike the others, GitHub Actions is now part of the GitHub ecosystem and it’s an integral part of it. Plus as GitHub is the biggest host of the open-source code with the largest community, it‘s very likely that it will be used in many projects available on this platform.
What we try to achieve? #
Moving forward I want to show you how I’ve set up GitHub Actions in one of my Java projects. It’s called Notice Board and is a simple REST CRUD application made with Spring Boot. It provides a couple of REST endpoints to manipulate data saved in the database. (when I write these words the app is still under construction, but the core is already there)
In this project, I’ve defined two GitHub Actions workflows that are triggered depending on which branch’s new code was pushed.
My basic git branch is master and whenever I push/commit new code there I want to trigger a workflow that will:
compile the code,
test it (both unit & integrations tests),
run static code analysis (SonarCloud),
create & publish artifact in the GitHub Packages repository,
create & publish a Docker image with an application on the Docker Hub.
As you might guess all these steps took some time (around 3'30’’) and also because I don’t want to publish new artifact and Docker image whenever I push new code to GitHub I’ve created a second, more simple workflow.
Feature Branch Workflow #
How I work with my code on a daily basis?
When I add a new feature, remove code smells or bugfix my application I usually don’t commit directly into the master branch. I create a separate branch, usually with a name that starts with feature/ or bugfix/, and when I’m done with a job I merge changes (e.g. using pull request) into the master branch.
And whenever I push new code to such branch I don’t want to run the entire workflow. I only want to make sure that my code compiles and all unit tests are passing.
The only thing that you need to do to enable GitHub Actions is to add a YAML file (maven-feature.yml) into the .github/workflows folder located in the root of your project.
A file looks as follows:
name: Feature Branch

on:
  push:
    branches-ignore:
      - 'master'
      - 'release*'

jobs:

  test:
    name: Unit Test
    runs-on: ubuntu-18.04

    steps:
      - uses: actions/checkout@v1
      - name: Set up JDK 11
        uses: actions/setup-java@v1
        with:
          java-version: 1.11
      - name: Maven Package
        run: mvn -B clean package -DskipTests
      - name: Maven Verify
        run: mvn -B clean verify
It’s self-explanatory, but let me explain it line by line. Full documentation of workflow syntax can be found on the official website.
First, name: Feature Branch , indicates the name of the workflow that will be displayed.
Next, there is a section where we tell on what action we want to trigger this particular workflow.
    on:
      push:
        branches-ignore:
          - 'master'
          - 'release*'
It tells that it will run whenever a new code is pushed onto a branch that is not master or does not start with a name release (I do not cover release branch workflow in this blog post, I will do that in next blog post).
And finally, we move on to the jobs section.
    test:
        name: Unit Test
        runs-on: ubuntu-18.04
As it’s a very simple workflow, it consists only one job with id test and full name — Unit Test. In the runs-on element, we tell which type of machine we want to run our workflow. I’ve picked Linux’s ubuntu-18.04 but you can choose also from Windows or macOS.
And finally, we can move to the steps section where we have 4 steps defined:
    steps:
       - uses: actions/checkout@v1
       - name: Set up JDK 11
         uses: actions/setup-java@v1
         with:
           java-version: 1.11
       - name: Maven Package
         run: mvn -B clean package -DskipTests
       - name: Maven Verify
         run: mvn -B clean verify
In a first action, we’re reusing an action — actions/checkout@v1 which makes sure that workflow has access to the code.
Actions in the GitHub Actions ecosystem are the atomic building blocks. You can define them on your own (I’ll show you that just in a second) or reuse already existing one, published by the community. Their list could be found on GitHub Marketplace or in the curated lists like this one.
Next, we need to set up a Java version. In my case, it’s Java 11. And for that, we also reuse publicly available action — actions/setup-java@v1 . The only difference is that here we’re providing the argument ( with parameter) to let workflow which Java we want to have.
And finally, we have two steps for compiling ( mvn -B clean package -DskipTests ) and running unit tests ( mvn -B clean verify ). If you’re familiar with Maven you probably know them already.
And that’s it! If you now push some code to your feature branch on GitHub a new workflow should starts (You can check that in Actions tab, on the main page of your repository).

Master Branch Workflow #
As I mentioned before, this workflow is much more complex than the previous one. It has two stages Test and Publish.
In a first stage workflow is running two parallel jobs:
for both unit and integration tests,
for running static code analysis and publish its results on the SonarCloud website.
Only when both of these tasks end successfully a second, Publish, the stage is started. During it there are again two parallel jobs running:
In first one software artifact is created and published in GitHub Packages repository,
in a second a Docker image with and application is created and published on Docker Hub.

For a previous workflow, we need to create a YAML file in .github/workflows directory. But this time it should look like this:
name: Master Branch

on:
  push:
    branches:
      - 'master'

jobs:

  test:
    name: Test - Units & Integrations
    runs-on: ubuntu-18.04

    steps:
      - uses: actions/checkout@v1
      - name: Set up JDK 11
        uses: actions/setup-java@v1
        with:
          java-version: 11.0.4
      - name: Maven Package
        run: mvn -B clean package -DskipTests
      - name: Maven Verify
        run: mvn -B clean verify -Pintegration-test

  sonar:
    name: Test - SonarCloud Scan
    runs-on: ubuntu-18.04

    steps:
      - uses: actions/checkout@v1
      - name: Set up JDK 11
        uses: actions/setup-java@v1
        with:
          java-version: 11.0.4
      - name: SonarCloud Scan
        run: mvn -B clean verify -Psonar -Dsonar.login=${{ secrets.SONAR_TOKEN }}
        env:
          GITHUB_TOKEN: ${{ secrets.GITHUB_TOKEN }}

  artifact:
    name: Publish - GitHub Packages
    runs-on: ubuntu-18.04
    needs: [test, sonar]

    steps:
      - uses: actions/checkout@v1
      - name: Set up JDK 11
        uses: actions/setup-java@v1
        with:
          java-version: 11.0.4
      - name: Publish artifact on GitHub Packages
        run: mvn -B clean deploy -DskipTests
        env:
          GITHUB_TOKEN: ${{ secrets.GITHUB_TOKEN }}


  docker:
    name: Publish - Docker Hub
    runs-on: ubuntu-18.04
    needs: [test, sonar]
    env:
      REPO: ${{ secrets.DOCKER_REPO }}

    steps:
      - uses: actions/checkout@v1
      - name: Set up JDK 11
        uses: actions/setup-java@v1
        with:
          java-version: 11.0.4
      - name: Login to Docker Hub
        run: docker login -u ${{ secrets.DOCKER_USER }} -p ${{ secrets.DOCKER_PASS }}
      - name: Build Docker image
        run: docker build -t $REPO:latest -t $REPO:${GITHUB_SHA::8} .
      - name: Publish Docker image
        run: docker push $REPO
Like before, first we define workflow name and conditions which will trigger it. We want to run it only on the master branch therefore following section looks as follows.
    on:
      push:
        branches:
          - 'master'
Test — Units & Integrations
Next, there are job definitions. The first one, testis very similar to one from the Feature Branch Workflow. The only difference is that this time we run both unit and integrations tests. Therefore in -Pintegration-test option was added to Maven CLI command mvn -B clean verify -Pintegration-test.
Basically it tells Maven to run the same mvn verify command but with additional Maven profile that has an additional dependency. And therefore, in order to make it running correctly, we need to add an integration-test profile to the pom.xml file.
<profiles>
	<profile>
		<id>integration-test</id>
		<build>
			<plugins>
				<plugin>
					<groupId>org.codehaus.mojo</groupId>
					<artifactId>build-helper-maven-plugin</artifactId>
					<version>3.0.0</version>
					<executions>
						<execution>
							<id>add-integration-test-sources</id>
							<phase>generate-test-sources</phase>
							<goals>
								<goal>add-test-source</goal>
							</goals>
							<configuration>
								<sources>
									<source>src/integration-test/java</source>
								</sources>
							</configuration>
						</execution>
					</executions>
				</plugin>
				<plugin>
					<groupId>org.apache.maven.plugins</groupId>
					<artifactId>maven-failsafe-plugin</artifactId>
					<version>3.0.0-M3</version>
					<executions>
						<execution>
							<id>failsafe-integration-tests</id>
							<phase>integration-test</phase>
							<goals>
								<goal>integration-test</goal>
								<goal>verify</goal>
							</goals>
							<configuration>
								<skipTests>false</skipTests>
							</configuration>
						</execution>
					</executions>
				</plugin>
			</plugins>
		</build>
	</profile>
</profiles>
This profile does two things — with build-helper-maven-plugin it enables Maven to find integration test classes located in a seperate directory — src/integration-test/java. And with maven-failsafe-plugin it enables to run integration tests.
Test — SonarCloud Scan
Next job definition:
    sonar:
        name: Test - SonarCloud Scan
        runs-on: ubuntu-18.04
        steps:
          - uses: actions/checkout@v1
          - name: Set up JDK 11
            uses: actions/setup-java@v1
            with:
              java-version: 11.0.4
          - name: SonarCloud Scan
            run: mvn -B clean verify -Psonar -Dsonar.login=${{ secrets.SONAR_TOKEN }}
            env:
              GITHUB_TOKEN: ${{ secrets.GITHUB_TOKEN }}
Similar to the testing job, first we define on what machine and with what Java version it will run.
The only difference is in mvn verify command where we need to provide two parameters — -Psonar and -Dsonar.login=${{ secrets.SONAR_TOKEN }} .
First one indicates that we want to run Maven command with sonar profile which definition we need to add to pom.xml.
<properties>
	<code.coverage.exclusions>
		**/com/wkrzywiec/medium/noticeboard/controller/dto/**,
		**/com/wkrzywiec/medium/noticeboard/entity/**,
		**/com/wkrzywiec/medium/noticeboard/Application.java
	</code.coverage.exclusions>
</properties>

<profiles>
	<profile>
		<id>sonar</id>
		<properties>
			<sonar.sources>.</sonar.sources>
			<sonar.inclusions>src/main/java/**,src/main/resources/**</sonar.inclusions>
			<sonar.exclusions>${code.coverage.exclusions}</sonar.exclusions>
			<sonar.projectKey>wkrzywiec_NoticeBoard</sonar.projectKey>
			<sonar.organization>wkrzywiec</sonar.organization>
			<sonar.host.url>https://sonarcloud.io</sonar.host.url>
		</properties>
		<activation>
			<activeByDefault>false</activeByDefault>
		</activation>
		<build>
			<plugins>
				<plugin>
					<groupId>org.sonarsource.scanner.maven</groupId>
					<artifactId>sonar-maven-plugin</artifactId>
					<version>3.7.0.1746</version>
					<executions>
						<execution>
							<phase>verify</phase>
							<goals>
								<goal>sonar</goal>
							</goals>
						</execution>
					</executions>
				</plugin>
			</plugins>
		</build>
	</profile>
</profles>
With this profile we enable SonarCloud analysis and define where the source code is located, what classes & packages should be excluded from the analysis and what is SonarCloud URL.
To make it work, you need to have an account on https://sonarcloud.io/. If you don’t have it go there and sign up, preferably using your GitHub account.

Then, after your logging in, you need to create a new project.
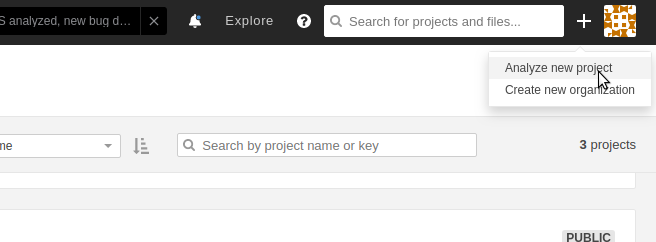
If you’ve never created one, there is a great chance that on a page right after your login there will be the big button that guides you to create a first project. Because I’ve already has some projects, I don’t have such big button on the main page. If its also your case search for plus sign (+) in the top right corner, click it and then select Analyze new project.
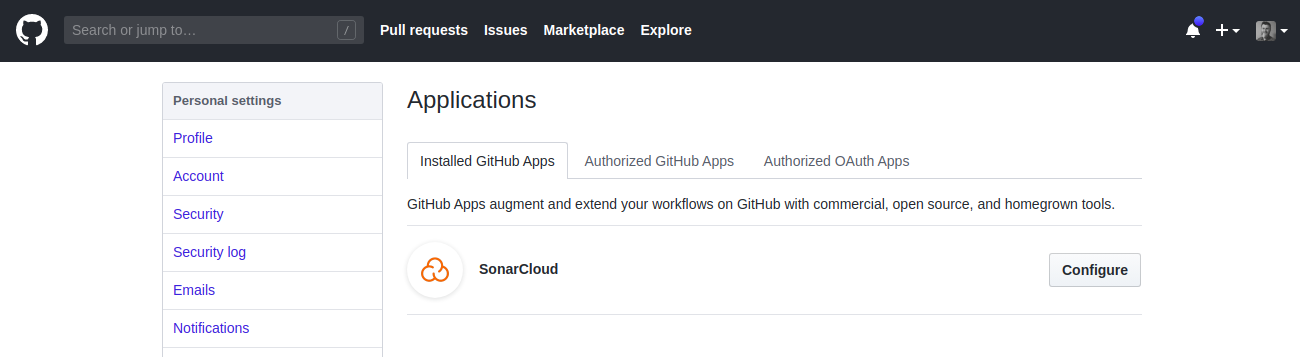
Then, on a new page you should see the full list of all your GitHub repositories. If it’s not the case, as it is for me, click on GitHub app configuration.

It will lead you to Installed Application GitHub Settings page where you need to find SonarCloud and click Configure.
On the next page scroll down to the Repository access section and choose All Repositories and click Save.

Now you can move back to SonarCloud to a place where you select for which repository you want to create a project. In a search bar type the name of your repository, click on it and then click Set Up button.

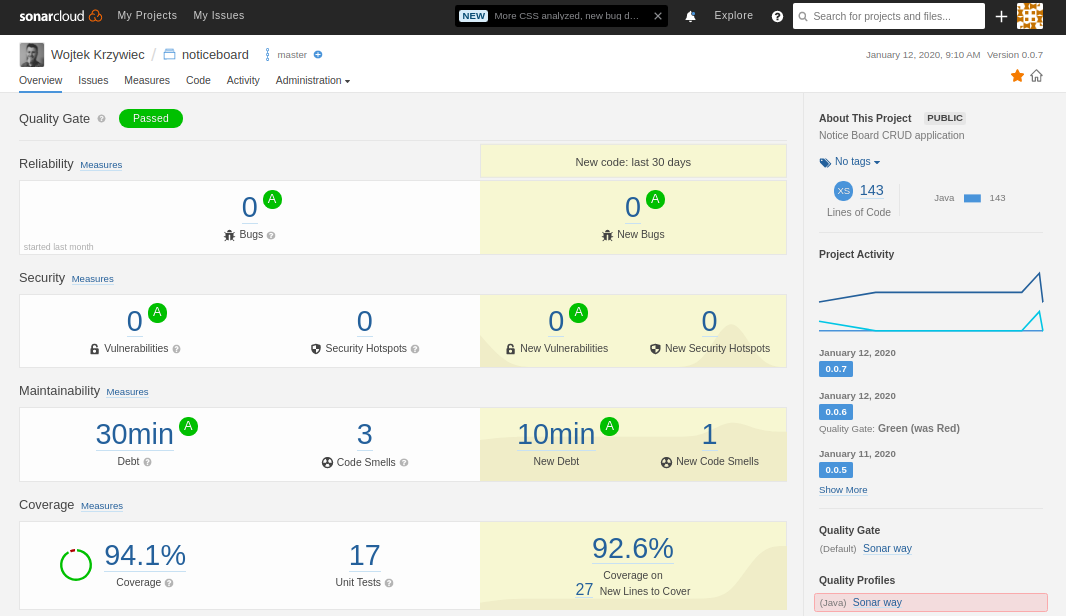
A dashboard page for your project will show off.

Now we need to get your Sonar login therefore, click on With other CI tools. On a new page for a question What is your build technology? select Maven.
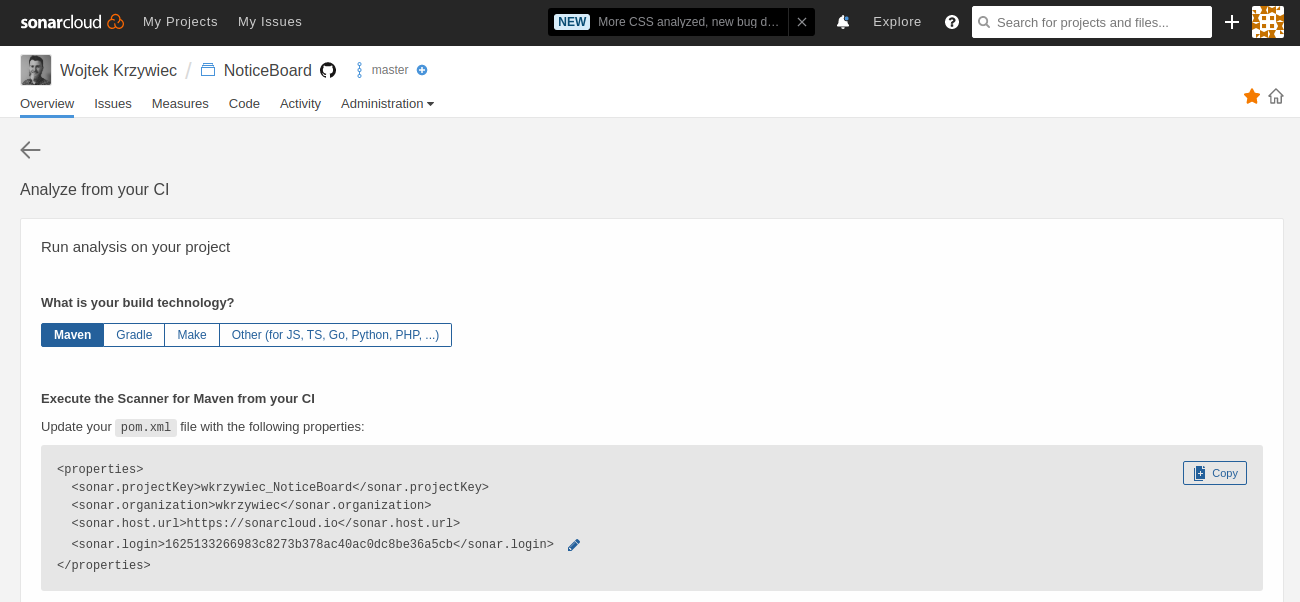
As it’s suggested on the screen, update your pom.xml file in a sonar profile section. The only thing that you should not copy is <sonar.login> value.
The reason for that is because when you add it to a file it will be then under git control version and will be visible for all people who will check your repo.
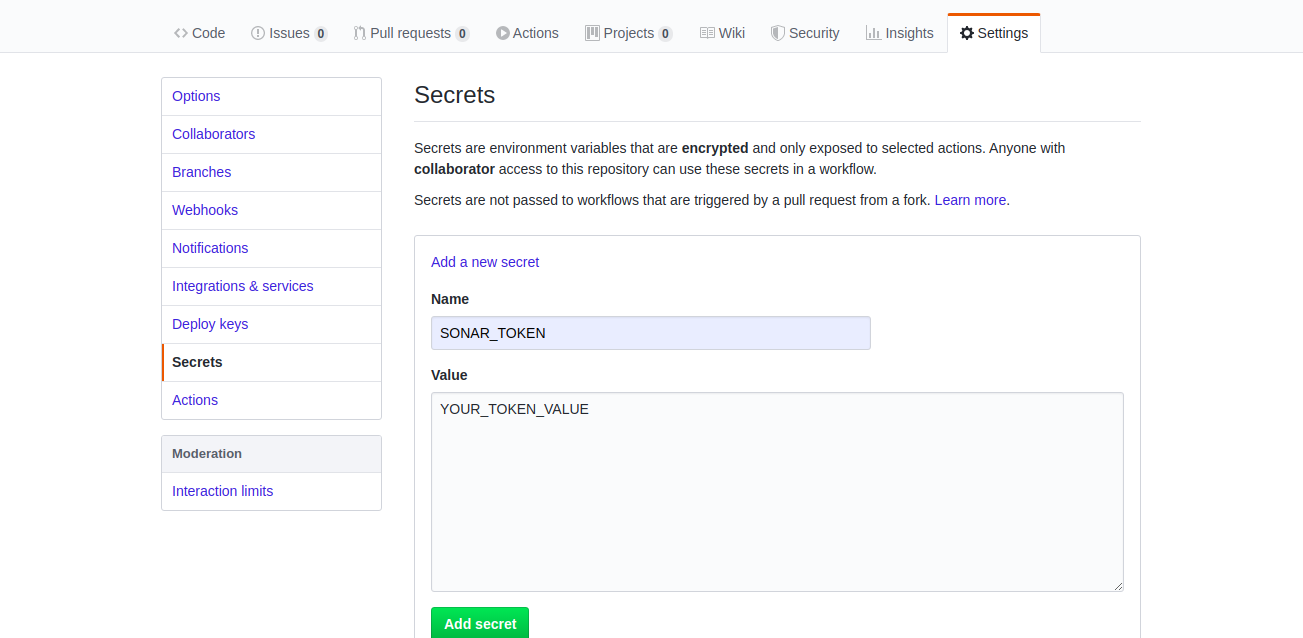
To mitigate this security breach don’t add it to pom.xml file. We will create a GitHub Secret which will be passed to our GitHub Actions workflow.
In order to create a secret, go to GitHub project page, then Settings -> Secrets. There click on Add a new secret and add a new one with a name SONAR_TOKEN and a value from<sonar.login> .
And that’s it. Our workflow will use this secret for code analysis, because in the Maven command we provide it as a parameter:
mvn -B clean verify -Psonar -Dsonar.login=${{ secrets.SONAR_TOKEN }}
Moreover, in this step it is required to have your GITHUB_TOKEN available as an environment variable. Therefore this line was added.
    env:
      GITHUB_TOKEN: ${{ secrets.GITHUB_TOKEN }}
After running the workflow you can go to the SonarCloud to the project’s dashboard and analyze a report.
Publish — GitHub Packages
The test stage is right behind us, so we can now move on to the stage called Publish, which includes a job that publishes an artifact on GitHub Packages repository.
If you don’t know what’s artifact you can imagine it as a software package that can be compiled, tested and reused in other software. The example of such would be the JUnit 5 library that available on Maven Central Repository.
The goal of this job is to publish the application as a runnable JAR file.
    artifact:
        name: Publish - GitHub Packages
        runs-on: ubuntu-18.04
        needs: [test, sonar]
        steps:
          - uses: actions/checkout@v1
          - name: Set up JDK 11
            uses: actions/setup-java@v1
            with:
              java-version: 11.0.4
          - name: Publish artifact on GitHub Packages
            run: mvn -B clean deploy -DskipTests
            env:
              GITHUB_TOKEN: ${{ secrets.GITHUB_TOKEN }}
If you look at the above definition of this job you’ll see that most of the stuff was already discussed.
New, needs parameter has appeared, which tells that this job can be run only when two previous one — test and sonar are finished successfully. Otherwise it won’t run.
In the list of steps, besides the usual ones with setting up JDK and so on, there is a Maven command that deploys an app into the GitHub Packages.
mvn -B clean deploy -DskipTests
Similar to the previous one this job also requires GITHUB_TOKEN available as the environment variable.
But this is not everything that we need to do here. We need to add the
    <distributionManagement>

      <repository>
        <id>github</id>
        <name>NoticeBoard Simple CRUD application</name>
        <url>https://maven.pkg.github.com/wkrzywiec/NoticeBoard</url>
      </repository>

    </distributionManagement>
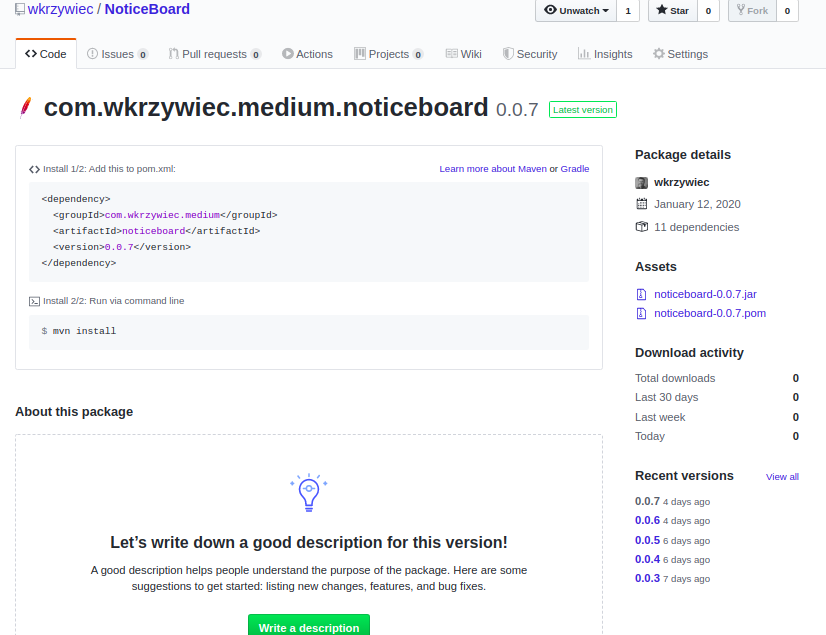
Now if you run the workflow it should publish an artifact. To check it out, go to your project main page in GitHub and in the place where you’ve got information about the number of commits, branches etc., you’ve information about the number of packages.

When you click on it, it will take you to packages page

After clicking on the artifact name it will direct you to its detailed page, where you can find all information about how to install it, list of versions and download activity.
Notice! When I write this blog post there is one limitation of GitHub Packages (or at least I couldn’t find the solution for that). In order to make workflow work you need to change a version of your application (in pom.xml file) everytime you run it! It’s because for now, GitHub Packages doesn’t support mutable artifacts (packages), like -SNAPSHOT. In other word, once you publish a version of your application you won’t be able to publish it again with the same version number! GitHub package registry as Maven repo - trouble uploading artifact | github.community
Publish — Docker Hub
And finally the last job — publishing the application’s Docker image on Docker Hub.
Before jumping to setting up this job you need to have an account on Docker Hub. If you don’t have one, sign up here.
    docker:
        name: Publish - Docker Hub
        runs-on: ubuntu-18.04
        needs: [test, sonar]
        env:
          REPO: ${{ secrets.DOCKER_REPO }}
        steps:
        - uses: actions/checkout@v1
        - name: Login to Docker Hub
          run: docker login -u ${{ secrets.DOCKER_USER }} -p ${{ secrets.DOCKER_PASS }}
        - name: Build Docker image
          run: docker build -t $REPO:latest -t $REPO:${GITHUB_SHA::8} .
        - name: Publish Docker image
          run: docker push $REPO
Again, at the beginning all looks pretty the same. Similarly to previous job this one also could be started only when test and sonar end up successfully.
A new thing, before steps definition, is that for entire job we define a new environment variable REPO . It’ll hold a Docker repository name where we want to publish an image. It should follow the pattern YOUR_USERNAME/YOUR_PROJECT_NAME which in my case is wkrzywiec/noticeboard (notice that all of it is written with lowercase letters). This value you need to add as a GitHub secret that is called DOCKER_REPO.
Moving forward to the job’s steps, it doesn’t require to have Java set up, so this step is removed, so a first new one is:
    - name: Login to Docker Hub
      run: docker login -u ${{ secrets.DOCKER_USER }} -p ${{ secrets.DOCKER_PASS }}
Then there is a first job that’s called Login to Docker Hub where we’re providing username ( DOCKER_USER ) and password ( DOCKER_PASS ) which are necessary before pushing new image to Docker Hub. As you might guess both values should be added as GitHub Secret.

    - name: Build Docker image
      run: docker build -t $REPO:latest -t $REPO:${GITHUB_SHA::8} .
Then there is a step in which a Docker image is created. To make it work in the project root folder it required to have a **Dockerfile. **The definition of this file depends on you and here is mine
FROM maven:3.6.3-jdk-11-slim AS build
RUN mkdir -p /workspace
WORKDIR /workspace
COPY pom.xml /workspace
COPY src /workspace/src
RUN mvn -B -f pom.xml clean package -DskipTests

FROM openjdk:11-jdk-slim
COPY --from=build /workspace/target/*.jar app.jar
EXPOSE 8080
ENTRYPOINT ["java","-jar","app.jar"]
If you want to know more about Dockerfile you can check my other blog posts on this topic —How to put your Java application into Docker container or How to run database, backend and frontend in a single-click with Docker Compose.
Also to created image two tags are assigned:
-t $REPO:latest tags the image with the latest tag,
-t $REPO:${GITHUB_SHA::8} tags the image with first first 8 characters of the commit SHA which will be a version number of published image. GITHUB_SHA is GitHub Actions environment variable available for every workflow.
- name: Publish Docker image run: docker push $REPO
And at last above command use built and tagged image and publish it on Docker Hub.
Everything is set up now, so you can push all the changes to GitHub onto master branch. And this action should trigger a full workflow.

Which will result with publishing image on Docker Hub.

Conclusion #
Recently published GitHub Actions proves that it has great potential to be an amazing CI/CD tool. In couple of minutes you can create a full workflow that checks if your Java application is compiling, runs unit & integration tests, runs static code analysis and publish the outcome to artifact and Docker image repository.
A full source code of the NoticeBoard app can be found on GitHub.
wkrzywiec/NoticeBoard | github.com
Moreover I’ve got separate repository with definitions of all my workflows:
wkrzywiec/MyGitHubActions | github.com