Deployment of Spring MVC app on a local Tomcat server for beginners
Table of Contents

At last, you’ve done it. After several hours of design, coding and testing your application is ready to be published. And as it is a web application, it requires an HTTP server to host it. So in this blog entry I would like to describe how I’ve mange to do it with Apache Tomcat server.
Apache Tomcat #
Before I jump to step-by-step instructions I want to very shortly explain what Apache Tomcat Server is.
So it’s an open-source program that process HTTP requests to access to the files stored within a server. These files can be static (it means that whenever a client asks for it they will be shared as they are) or dynamic (before sending files to the client they are generated by the software hosted on a server). In my case I want to have a dynamically generated web pages and for this task I’ve created Library Portal Spring MVC application, which will be hosted on Apache Tomcat server.
So in short, Tomcat handles communication via HTTP protocol and delegates requests to my Spring MVC app.
Apart from Apache Tomcat there are over HTTP servers to host Java apps and it would be JBoss, Glassfish or Jetty.
If you develop JavaScript backend apps you probably make a use of Node.js.
In next section I would like to show a way to deploy Spring MVC app together with MySQL database. I’m aware that it might not be the only way to do that, but for beginners it might the best approach (minimum config steps are required).
Installation #
MySQL Workbench #
My app requires a database and for that I’ve picked opensource MySQL database system. Therefore we need to install MySQL Workbench. During installation keep all defaults. Also you will be asked to create a root user, which will work as an admin.
Apache Tomcat #
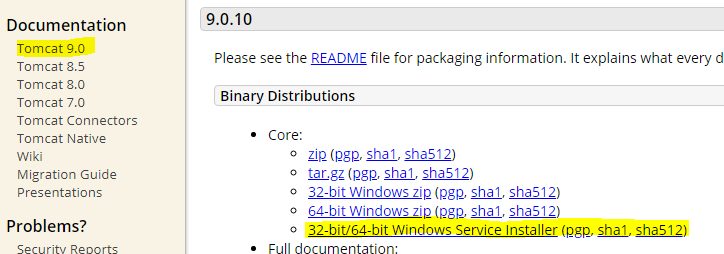
Go to Apache Tomcat official website to install web server. There, on a left hand side, you should see list of Tomcat versions. I’ve picked the latest one, which is with the number 9. From the list I’ve selected Windows Service Installer.
Installation goes in a standard way, beside one step, on which you need to provide port of your server, Windows Service Name or create admin user. The window looks as follows.

For non-Windows user follow these instructions for Ubuntu and Mac.
Configuration #
MySQL Workbench #
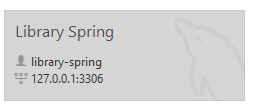
Open the MySQL Workbench app. The home screen should appear one tile with the title Local instance MySQL57 (or else depending on the installed version). Double click on it so you will be eable to write a query.
Here I’ve wanted to create a new user with full privileges. This user will be used to connect to the database by the application.
CREATE USER 'library-spring'@'localhost' IDENTIFIED BY 'library-spring';

GRANT ALL PRIVILEGES ON  *.* TO 'library-spring'@'localhost' WITH GRANT OPTION;
Note. Make sure that the address of your database is the same as you have provided in the app config file. Otherwise it won’t run. From Workbench perspective you can check that on the home screen, which in my case will be 127.0.0.1:3306 (default, local address). Information of this address are stored in the properties file in the app (properties file is loaded by the Spring config Java class).
Apache Tomcat #
Once installation is completed Tomcat should be already running on your PC. A small icon on the taskbar will be indicating it.
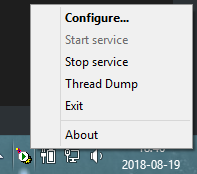
With this icon you are able to configure and start/stop your Tomcat server very quickly.
In the directory where you’ve installed Tomcat you’ll find config folder, where are several config files that are worth mention.
server.xml — it’s server’s main configuration file, where TCP port number is indicated, but also it allows to arrange in advance way (e.g. define Tomcat’s Listeners, Services,Connectors and others). More about those config could be found here and here.
web.xml — it’s used to config each app that is deployed on the Tomcat server, where all servlets are defined and also some external resources as well (like test database that is shared amoung the apps). Note that this, global configuration, could be override by a specific application. The main reason for that behaviour is it because we should not store whole configuration of mutliple apps in a single file. More info about Tomcat’s web.xml file could be found here.
context.xml — Context represents web application (context contains only one servlet) which runs within particular Tomcat instance and these are gathered in the Context Container. This file contains all configs for a Context. More words about it can be found here.
tomcat-user.xml — as you might already guess, here is the list of the users that has access to the server with their roles. Description of roles that are available for Tomcat could be found here.
In our case you don’t need to amend anything, keep all the defaults. To test if a server is running in the web browser type:
And you should get Welcome to Tomcat page:

Deployment #
MySQL Workbench #
To be honest, the database is up and running already. The only thing that has left to do is run the scripts for creating tables and populating them with some data. An example of such script can be found here.
Apache Tomcat #
Finally, everything is configurated, so we can deploy our app. First we need to export our project into war file.
- Create WAR file of Spring MVC project
I assume that you are using Eclipse IDE, so in this case right-click on the project name and from the list select Export->WAR file and save a file in the destination folder.
- Deploy WAR file using Apache Tomcat Manager
Open your web browser and type:
http://localhost:8080/manager/html
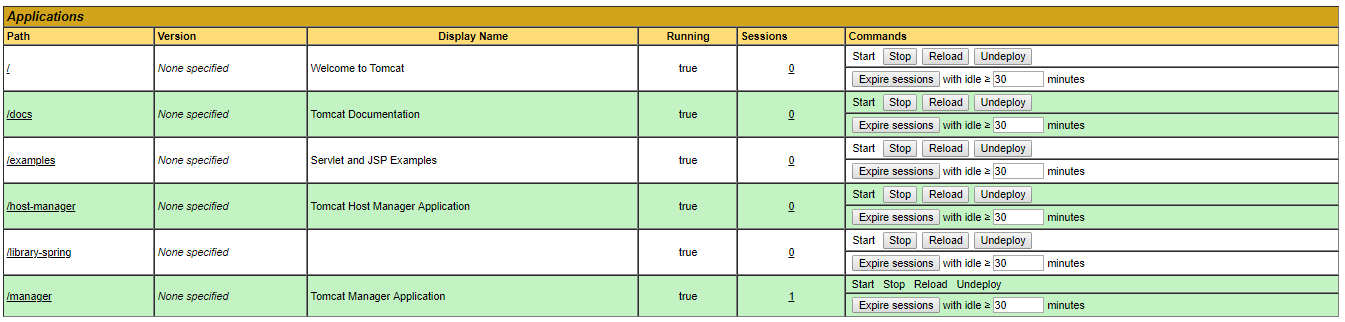
So you should get following screen. If you are not, make sure that you typed correct address (maybe you’re using different port number). Also can restart Tomcat, which should do the trick.

Here, scroll down to Deploy section and its sub-section WAR file to deploy, where you provide the path to a WAR file that you’ve created. After that click Deploy button. And that’s it your app is listed on the server’s applications list.
To test it I’ve typed following address:
http://localhost:8080/library-spring
And the login page appears.

If you want to have a look on my project visit this page:
wkrzywiec/Library-Spring | github.com
Also if you’re interested in my project, Library Portal, you can check other entries related to it (where I describe frameworks and libraries that I used in it) here:
Library Portal — Spring Project Overview | medium.com
References #
- Apache Tomcat® - Welcome! | tomcat.apache.org
- Application Developer’s Guide (9.0.10) - Table of Contents| tomcat.apache.org
- MySQL :: MySQL Workbench | mysql.com
- MySQL Workbench Tutorial & MySQL Introduction | guru99.com
- How to Deploy Spring Application in Tomcat - A Spring MVC Deployment Guide | dailyrazor.com
- Configuring a SQL Server Datasource in Apache Tomcat | confluence.atlassian.com
- Java Servlet Tutorial - How to Install Tomcat 8 (on Windows, Mac OS and Ubuntu) and Get Started… | ntu.edu.sg