Project development history lesson with git
Table of Contents

When I’ve started to learn programming I quickly come up with situations when small, tiny changes in the code that I made turned into some sort of error (compile, logical, etc.). In these kind of situations I simply tried to fix it or undo broken part of the code. If it was a simple project, it was pretty straight forward, but with complex application it was not. Moreover number of difficulties raised when I was collaborating on the same application with others. It was hardly to achieve common version of our program, when all of us was modifying it at the same time. Luckily there are Version Control Systems that helps with these issues, and the most popular one is called git.
Git Philosophy #
In short, version control is a system that tracks changes made in the files over time, so it is easy to learn the whole history of a code. It works similarly to save-load feature from video games, but it is more powerful than that. Version control systems allows to save a ‘snapshot’ of the code at any point and if necessary revert it back if something go wrong, just like in video-games. Of course git is more complex than that, it enables collaboration across many members and helps them to resolve all the conflicts within the code. Such conflicts can occur when developers are modifying same part of the code. Finally git allows to create and move between versions of application, for example our app can be marked with v.1.0 version, which customers are already using it, but developers can be working on some patches, so it’ll be marked with version v.1.1.
So everything is clear? I guess not :). Ok, so let me go step by step explain how I understand version control system. Let’s assume that we’ve made some changes in our code and commited (saved) it in our git repository. After that git will create a snapshot of our files and store it. It is important to understand that only the part that has changed will be stored in a new snapshot, remaining part will be linked by reference to a version that was already saved. It a basic difference between git and other VCSs, which stores only the differences (diff) between commits. Other thing that makes git unique is that almost all actions are made locally, there is no need to connect to any global repository. This approach makes git really fast and network independent, because you work on your local files and can update all changes to global repository only when you decide to.
When you will work with git that each file can be in one of these three states:
modified (unstaged) — means that file was modified, but it is not designated to be included in next commit,
staged — this file was designated to be in next commit,
commited — means that file was successfully stored in a git database.
Based on these states we can distinguish below workflow:
Modify files related to a bug/feature.
Pick only those files that are related to one bug/feature and mark them as staged.
Do a commit, so the code snapshot will be permanently stored in the database.
Usually you should work on one bug/fix at the time, so you will stage all the files, but sometimes it is better to divide your fix into smaller commits (for better readability), so not all of them will be stage at once.
At this point it is worth noted that version control can be done only under text files, so it is not possible to check history modification files like images, MS Excel, MS Word, etc.
There are several ways to work with git. The original way is to use command line, which is really efficient and elastic, but for beginners it is not so intuitive, so there are some GUI clients that can do most of the regular operations. Here is the list of clients that can be found on official website: git-scm.com
Another thing that it is worth to know is where you can have your repository. Technically, you can have it wherever you want. It can be at your local PC, shared drive, cloud, sharepoint, etc. It really depends on you. In my case, I want to share with you all of my work, so I decided to create a GitHub repository with which I will connect locally. Except for free storage GitHub has some cool sharing features (e.g. project main page, pull request, etc.) that made this portal so popular. github.com
Now I would like to move on to practical part of my entry, where I’ll explain only few *git *operations with examples, but I’m aware that it could not be enough, that it might not be self-explanatory. In many situations git has abstract concepts that are not easy to get, therefore I would recommend to check some interactive tutorials, that helps visualize some topics.
In next sections I assume that you have installed Git BASH for Windows. Instruction how to do that are in Codding part of the entry, here. All operations should be made in Git BASH command line. Please be aware, that Git BASH is only for Windows, so if you are using different OS, you probably you will need to go in different way to enter git command line.
Walkthrough basic commands #
Initializing repository & making first commit #
First thing that we need to tell git, which files we would like to track. In general there are two ways to do that. First is to create a new one, for example on you local PC. To do that go to the folder, which you designated for it (it could be your project folder) and run git command line there (or move to this folder using command line). Once you’ve got there type:
git init
It will create a new subfolder with a name .git. Now we need to stage files that we want to commit. In below example I’ve assumed that I want to stage all java files, so it should look like this:
git add *.java
Finally I could commit them, and my first commit was called ‘Initial load’:
git commit -m ‘Initial load’
Oh right, I’ve got first commit! If you forgot to add some files to commit you can add them so they will be included in latest commit.
git add forgotten_file.txt
git commit --amend
Except for confirmation that commit was done correctly, I’ve got information about the committer (me). By default, in Windows, it is using your user information (name and email), but it can be changed using following commands:
git config —-global user.name "Your Name"
git config --global user.email "you@email.com"
Second way to initialize git repository by cloning an existing one to local directory. To do that, go to a local folder and in command line type:
git clone https://github.com/wkrzywiec/Library-Spring.git
In above example, I’ve used URL of my project, but you can type any kind of URL, also it can be folder directory on your PC or shared drive.
Git branching #
Ok, so now let’s start a tricky part. Previously I was talking about git commit history as a linear sequence of events, which is true unless we want to make branches and these we will make a lot :). To explain why there are so important let’s consider following scenario. You are working on some new feature for your website and you’ve already made some changes, but suddenly you receive a very urgent and crucial information that something is not working on production and you need to fix it as soon as possible. So if you didn’t work in a separate branch you will probably need to revert changes that were provided for new feature and fix urgent bug. Then, when it will be fixed, you go back to development new functionality. All of these actions will incorporate a little chaos into git commit history, and after some time you won’t be able to track all commits that were related to specific feature/bug, especially when you work in a team, where each developer is working on different thing at the same time!
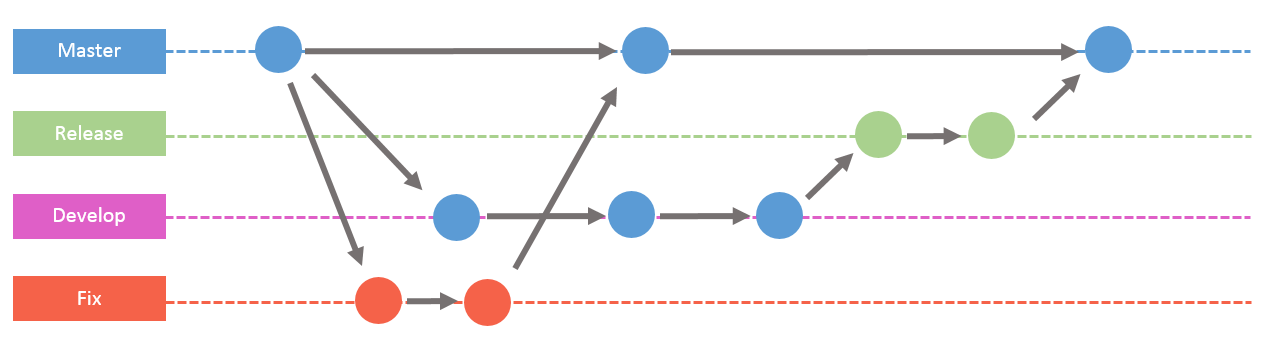
That is why branches were incorporated. A master is a main branch, from which all other are created, and it is usually used as production code. All new features/fixes are in separate branches. Another way is to split project into couple branches that will reflect different stages of the project, for example master (production), develop, fix and release, so each issue will be set up as a subbranch. Here is a diagram that to visualize it.
To sum up it is a good practice to keep in mind below mantra:
Branch early, and branch often
To create a new branch, testing, use below command:
git branch testing
Above command only creates testing branch but it won’t checkout into it,so all the commits will be saved in a branch that you already are. To switch into new created branch just type:
git checkout testing
Or you can combine last two commands into one:
git checkout -b testing
Once the branch is created we can make as many commits as we want. They will not be visible in production branch unless we say so and achieve it we need to use on of two methods — merge or rebase.
When we want to merge two branches we need to checkout into the branch we want to incorporate changes from different branch. For example we need to release new feature code, so first we need to checkout to master and then merge it with feature branch:
git checkout master
git merge feature
Using above instruction we’ve combined both branches, by creating new merge-commit in master. And that’s it! We can remove feature pointer (I’ll tell more about pointers in next section), as we won’t be using it in the future (because feature has been already released), but it is not necessary.
git branch -d feature
During the merge we can step on a merge conflict. It occurs when a code in master and feature branches were modified in the same area. Let’s go back to previous example, where we have three branches — master, fix and feature. The part of the code, that was modified in fix, is overlapping with some area of feature branch. In these kind of situations git don’t want to take responsibility for choosing which lines to use, it’s developers’ task. Git only ease this process by adding markers to conflict area. Typically it’ll look like this:
<<<<<<< HEAD

// fix code

=======

// feature code

>>>>>>> feature
Conflict area was divided into two parts. Above one is the part of the code that is in master (into which we want to merge) and below (after ======= ) we have feature code. These markers are added to our source code, so only needs to go to proper files and make proper corrections. And that’s it. After resolving all the conflicts we can easily merge both branches.
git merge --continue
Or we can decide not to merge, so for cleaning type:
git merge --abort
Above way is really simple and safe for developers to use, unfortunately in large teams when couple of devs are working on a same part of the code they are creating multiple branches, which could end up with hard to understand commit history.
To resolve it we can rebase feature branch onto master. We can do that by checking out onto feature branch and then rebasing:
git checkout feature
git rebase master
It means that we want to abandon feature with all it’s commits and rewrite them in master, so feature branch could not be used anymore. Also there is no new commit created, as it is during the merge. Thanks to this approach we’ve got much cleaner, linear commit history, but it has a cost.
From git point of view after rebase new commits where created, which means that the whole branch history has been changed. During the merge we’ve got info that changes on different branches were made parallely, but here all of it is presented as it was made continuously, which is not true.
This want be an issue if we work alone, but it might be a serious problem when we collaborate. Imagine situation when you share your local branch with central repository (you make a push), so all devs can work on it. Then you decide to rebase it, which means you destroy old and create new commits in master. And it can cause many problems if someone else was working on your branch or on master.
To avoid it here is a nice quote from Pro Git written by Scott Chacon and Ben Straub (link in References):
In general the way to get the best of both worlds is to rebase local changes you’ve made but haven’t shared yet before you push them in order to clean up your story, but never rebase anything you’ve pushed somewhere.
So rebasing is useful only when we use it on your own branches. If we stick to this rule everything will be ok, and we will gain a powerful toll. For example, using rebase we can combine several commits into one, or we can combine several subbranches of one feature into one, easy to read, branch. First trick can be made using this operation:
git checkout feature
git rebase -i HEAD~3
It means that last three commits will be combine into one. This operation contains new term — HEAD, let’s have more detail look on it.
HEAD #
Ok, so what is that mysterious HEAD? It is a pointer, that indicates on which branch and commit you currently are. By default HEAD pointer is on the latest commit in the branch, so if you want to previous commit just type:
git checkout HEAD^
If you want to move 4 commits back type:
git checkout HEAD~4
HEAD pointer does another thing, it can move around branches pointer and it can be done in following way:
git branch -f master HEAD~3
Second cool thing that is essential feature of git is reversing changes made with some commit. Let’s assume that you made some commits, but you have found out that they are incorrect and you want to roll them back. There are two ways to perform it — reset and revert.
First command will remove incorrect commit, so you never be able to go back to it. For example:
git reset HEAD^
It will remove latest commit in the branch and move pointer to one before. In other words this operation ‘rewrites history’, which is not good for collaboration. So if you want to share some branches with others you will need to use revert operation.
git revert pushed
This one will not delete any commit, it’ll create new one instead that will rollback all changes that were made in incorrect commit.
Checking commit history #
Sometimes we want to inspect commits history to know their sequence, when they were created and by whom. The best way to do that is to use some kind of GUI, as it should be the most intuitive way, but of course it can be done from command line. Here are some useful operations.
To show the list of all commits use log command:
> git log

commit  d5957c6423747651e05469c5c07d8fc5b1cdafbb
Author:
Date:

     New user registration

//previous commits
Above there is a sample outcome, which is a list of commits at the top there are the latest. The log operation has many arguments that can be used to modify the outcome, for example by adding -n
Next useful arguments are stat and p. First one will display some statistical information (like how many lines were modified). Latter shows all the diffs that were introduced in this commit.
> git log --stat -n 1

commit 61ae51b848b95cd7a2f38445841d4d04b2c003b8

Author: Wojtek <wojciechkrzywiec@gmail.com>

Date:   Sat Feb 24 17:14:31 2018 +0100

Signout in navigation bar
src/main/webapp/WEB-INF/views/home.jsp          | 9 ---------
src/main/webapp/WEB-INF/views/loginPage.jsp     | 2 +-
src/main/webapp/WEB-INF/views/shared/header.jsp | 7 ++++++-

3 files changed, 7 insertions(+), 11 deletions(-)


> git log -p -n 1

commit 61ae51b848b95cd7a2f38445841d4d04b2c003b8

Author: Wojtek <wojciechkrzywiec@gmail.com>

Date:   Sat Feb 24 17:14:31 2018 +0100

Signout in navigation bar
diff --git a/src/main/webapp/WEB-INF/views/home.jsp b/src/main/webapp/WEB-INF/views/home.jsp
index 021100e..519aa20 100644
--- a/src/main/webapp/WEB-INF/views/home.jsp
+++ b/src/main/webapp/WEB-INF/views/home.jsp

@@ -26,19 +26,10 @@

<jsp:include page="shared/header.jsp"/>

</div>
-<h2>Home page</h2>
-
-
User <security:authentication property="principal.username"/>
<br>
Role: <security:authentication property="principal.authorities"/>
<br>
-       <form:form action="${pageContext.request.contextPath}/logout"
-               method="POST">
-
-               <input type="submit" value="Logout" />
-
-       </form:form>
</body>
</html>

//other files
Another cool arguments that can be used to format the outcome can be found in git documentary or in the Pro Git book (link in the reference).
If you want to check the list of available branches just type:
> git branch

* master
 vanilla-spring-mvc-app
 vanilla-web-app
Branch marked with * is in which you currently are.
Except for log command there is also blame, that helps to track changes on particular file and sometimes it is more convenient to use it than log.
Remote repositories #
One of the key feature of git is that we can share our local repository with others. We can connect to centralized database, but we also can connect local files with more than one repository. For example, you and your friend can connect to open-source project and each one of you will make different modification that you don’t want to push (share) to open-source community. So you decide that you need to make connection (add new remote) with each other to share your changes.
In order to establish such connection just clone open repository or add it explicitly to existing local repository. First approach was covered in previous section, so here is sample line of latter one:
git remote add patterns https://github.com/iluwatar/java-design-patterns.git
First parameter, patterns, is an alias of the remote, so there will be no need to provide whole URL.
If you want to get all information that are in remote repo just type:
git fetch patterns
All data will be stored as separate, remote branches that, eg. patterns/fix. By default you’ll not be able to make any modification in such branch, first you’ll need to merge it to your local repo:
git merge patterns/fix
And now you should be able to work in this branch. Same thing can be done using pull command, but it will be done in one step.
git pull patterns
To make it more simple, fetch is a safe way to sync commits history, because it is not modifying local branches and it should be used for tracking changes in remote repo.
On the other hand, when we want to send work from local to remote repository we use push command.
git push patterns master
It means that I want to push local master branch into remotes’ (patterns) master branch. If you want to push your branch into remote branch with a different name use this expression.
git push patterns master:remoteBranch
Last thing that I want to mention is special kind of repository — bare repository. It does not have any source files, it stores only commit history. Thanks to that bare repositories are used for sharing and it works as a centralized place where users are pushing their changes, but they are not modifying source files in it. They just change history logs. Of course, when user is cloning it to her/his local PC it will be saved as regular working place.
Method to creat bare repository is:
git init --bare
All right, here it is. ‘Quick’ introduction to git. Now, let me explain how I have created GitHub repository for my project and connected it to local working directory.
Setting up new git repository #
Step 1. Install git. #
First I would recommend to install some lightweight git GUI client that will also install git. For Windows I use Git Bash, but there are more like TortoiseGit, SmartGit or GitHub Desktop (other git clients can be found on official website). Git Bash provides command line interface and also it includes Git Gui that visualize branch history. Download files can be found here: Git for Windows | gitforwindows.org
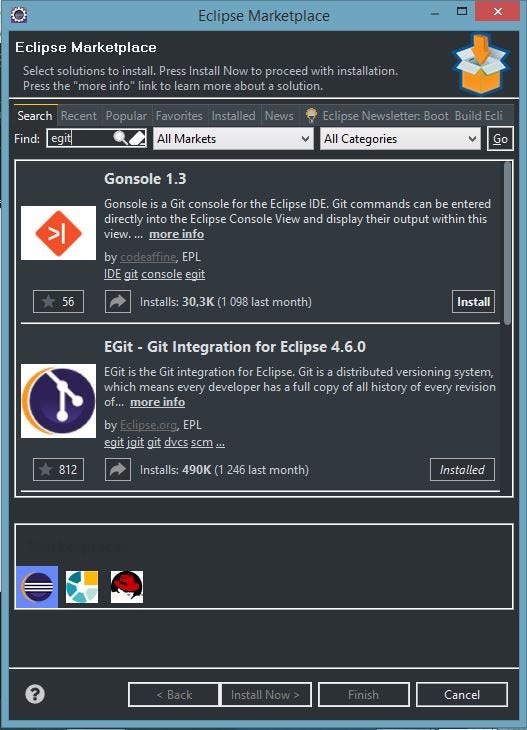
Step 2. Install EGit plugin to Eclipse. #
Once we’ve got git installed open Eclipse IDE and go to Eclipse Market (Help →Eclipse Market) and in search bar type EGit and a proper plugin should appear on the list. Next click Install and go through each step of installation (on below screenshot EGit is already installed).
Step 3. Create GitHub repository. #
I would like to share my project with the whole community, so I’ve decided to create a new GitHub repository that will be connected to my local. To achieve it first I need to create a new repository on a platform. So after logging to my account I go to Repositories and click New icon.

On the new page I just type a repository name, keep all other defaults and click Create Repository button.
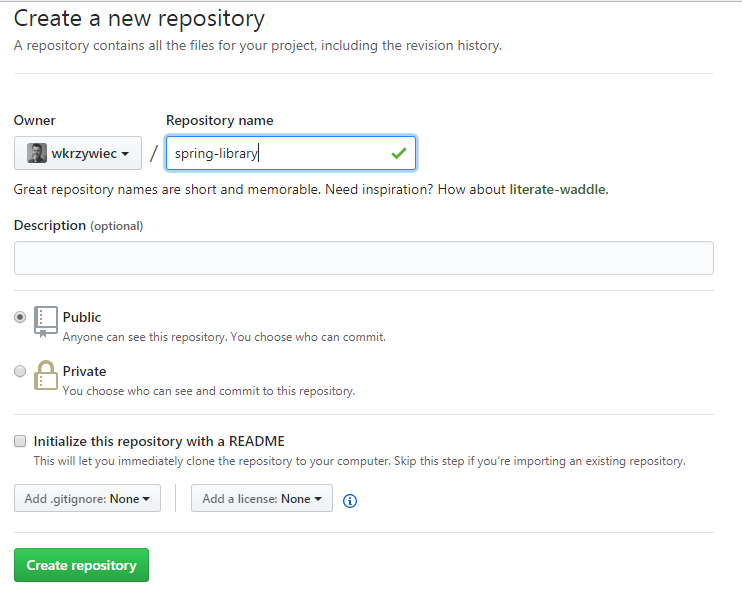
Last thing to do would be copying the repository link that showed up on the screen.
Step 4. Link GitHub repository with local project. #
Once we’ve got global repository let’s create a local on your PC and then connect them. So, go to Project Explorer in Eclipse IDE and righ-click on a project which you want to be in a git repository. From the list choose Team →Share Project… and in a new window tick Use or create repository in parent folder of project, click Create Repository button and Finish button.
Local repository has been created so now we need to create a first commit. So right-click on project name and go to Team → Commit… so Git Staging window will show up, which is divided into couple sections. In Unstage Changes section there are files that not designated to be included in the commit, so I moved them to Stage Changes section, provided Commit Message and clicked Commit.
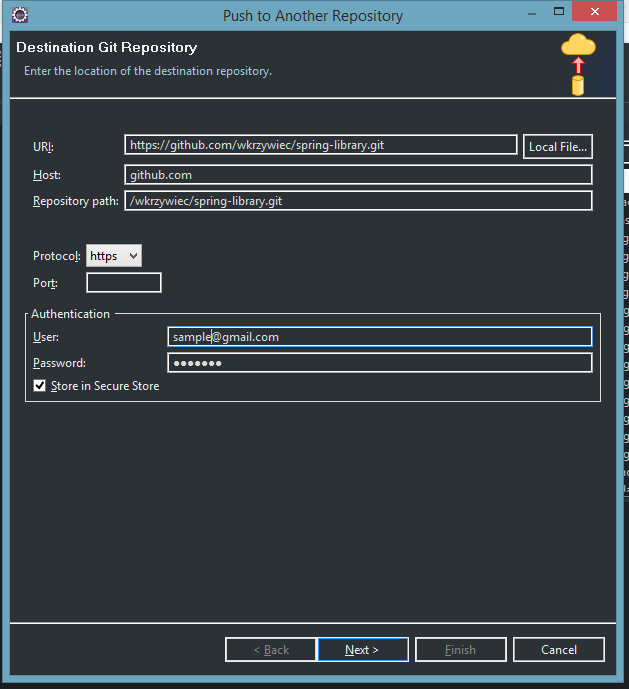
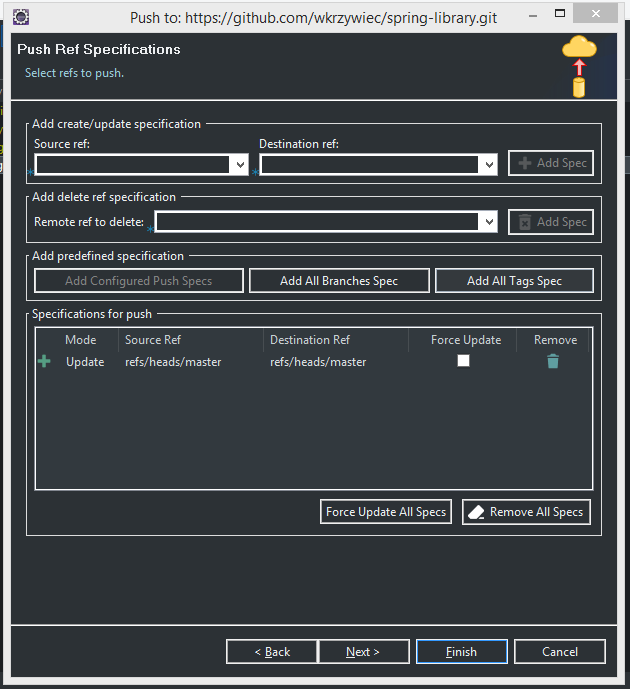
We’ve got first commit in local repository so we can now push it GitHub. To do that go to Git Repositories view. If you don’t see it go to Window → Show View… → Other… type git and from the list pick Git Repositories. In Git Repositories right-click on your local repository and go to Remote → Push… In a new window you will need to provide a HTTPS URL of GitHub repository and credentials to the account. In next window you need to provide Source ref and Destination ref, so from the pick lists choose master[branch] (once picked up, it will appear on a screen as refs/heads/master), click Add Spec icon and click Finish button.
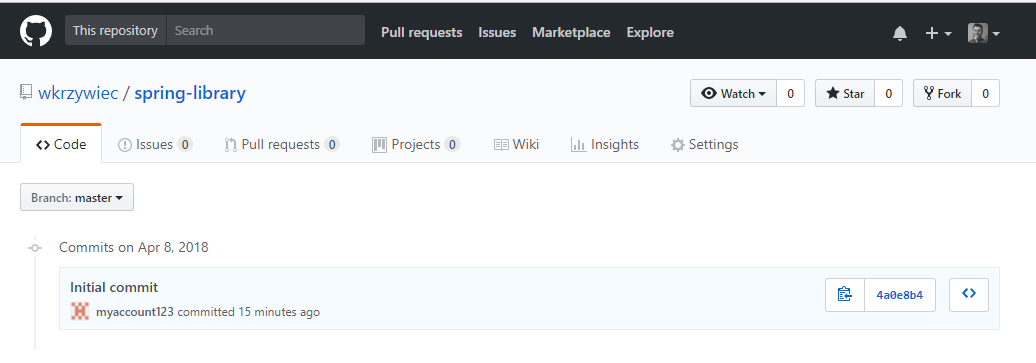
Eclipse will prompt you that your commit was pushed to remote repository. To check it go to the Github website and in a project page in Commits section you will see your first commit!
Step 5. Config .gitignore file. #
Previous steps are only necessary to establish git into Eclipse project, but there some other things that can be made, which might be useful. First one is .gitignore file. It can be used when in a project directory there are some files/folders that we don’t want to follow. For example Windows or Eclipse could create temporary files that are not part of our code. To overcome this we can provide files/folder patterns that can be excluded from git tracking. More about the patterns can be found on official website. In my project I’ve used gitignore generator from this page, so it looks like the following:
/.gradle/
/bin/
/build/

### Java ###
*.class

### Eclipse ###
.metadata
bin/
tmp/
*.tmp
*.bak
*.swp
*~.nib
local.properties
.settings/
.loadpath
.recommenders

### Eclipse Patch ###

# Eclipse Core
.project

# JDT-specific (Eclipse Java Development Tools)

.classpath

### Windows ###

# Windows thumbnail cache files
Thumbs.db
ehthumbs.db
ehthumbs_vista.db

# Windows shortcuts
*.lnk
Step 6. README file. #
Another cool thing that can be done is README file. It won’t facilitate software development process, but it can be useful for any reader/contributor of your project. This file is like a home page of the project, based on simple language (Markdown) that can be converted into HTML page that will be displayed on the main page of the repository in GitHub. It usually contains short explanation of the project with some screenshots and examples how it can be used. If you want to check how it looks go to my Library Portal repository page and for more information about the markdown visit these websites:
- Mastering Markdown | guides.github.com
- adam-p/markdown-here | github.com
- wkrzywiec/Library-Spring | github.com